Passage and endings of Fobia - St. Dinna Hotel. How to find all the keys, memories, weapons and solve all the riddles
In the game Fobia - St. Dinfna Hotel you will come across a huge number of secrets and non-obvious forks. Today we will tell you how to find the keys, solve all the puzzles and riddles, and collect notes and memories.
Please note that for convenience in passing, we highlight some items in different colors:
- Key items (passwords, keys, key cards) - in yellow ;
- Weapons, ammo, and upgrades are in red ;
- First aid kits (bandages, pieces of gauze, adhesive plasters, alcohol) - in green ;
- Documents, notes, and memoirs - in blue.
Prologue. Where to hide the diary and how to escape from the monster
Pick up the cell key and note from the ground. Open the grate with the key, and search the table to the left of the exit. Take the dossier and diary of Juan Luis in the drawers. Use the keys on the wall behind the table to open cell number "4" and hide the diary in the wall.
Approach the exit and pull the lever. After the cut-scene, you can not run, as it is impossible to save the hero.
Hotel (6th and 5th floors). How to get out of the room, how to use the camera, and where to find the red key card
Talk to the man at the reception and take the key to room "610". You can look around the hall and study the newspaper article about the life and death of the prophet Christopher. When you're ready, go to the B block elevator and go inside.
After the video, you will be in the room. First, you need to pick up a clock at the entrance table, a note from Stephanie, and a metal object. Examine the item in your inventory to find the code for the suitcase on the floor. It is worth noting that after each download, the cipher on this item will change.
Take a large bag on the table by the laptop. Such things allow you to increase the size of the inventory. Read the messages on the laptop screen and take a piece of gauze from the table. Use the code from the metal object on the suitcase and take the bathroom key. On the shelf in the restroom, take the camera lens and read the note with the code in another suitcase on the floor. The code is unchanged for all passages: "37251".
Return to the room and use the code on the safe to get a camera. Combine the camera body with the lens and use it. This is a key item in the passage of the game, which you will use everywhere. With it, you can be transported to 1960 and interact with objects that are inaccessible in our time. Pay attention to the image of the palm - a similar sign means that it is time to use the camera.
You can use the camera and examine the chest in front of the bed. Here you will also see a box that can be opened later.
Exit the room and examine the cabinet by the window. There is a note, a small bag, and a locked cabinet. Enter the next room and use the camera in the restroom. Now you can go through the wall and get into the corridor.
In the keyhole of room "608" take the key to the locker and go back. Use it to open the locker, take the key to room "608" and open the door. Examine the wall to the left of the entrance and remember the code "6749". Use the camera to interact with the safe and enter the password. Take a small bag and a simple bandage. In the next room, use the camera again to inspect the safe and pick up the key to room "606".
Exit to the corridor. Open the grate opposite the stairs, and take the note with the code. Go to the end of the corridor, pick up a small bag on the nightstand and a band-aid in the right locker. On the table by the stairs also take a piece of gauze. Go down to the 5th floor and watch the cut-scene with the mutated spiders.
We recommend inspecting the left side of the wing after you have a weapon. If you do this now, four spiders will attack you along the way. Open the grate opposite the stairs and inspect the drawers in the office. You will find four notes with which you can make a sentence: "There is a sequence here. " We will return to this riddle a little later.
Exit to the corridor from the opposite side and look at the wall on the right. Here you can use the camera, but now it's useless. Instead, go to the left and open the box with the red key card.
How to solve the lockers puzzle on the 5th floor ("There is a certain sequence here")
After the telephone conversation, return to the 6th floor. Use the key card and the code from the note "67352". Open the door and use the camera on the painting in the hallway. You will see the correct sequence of lockers to open (from left to right):
- First shelf: 4 and 10 lockers.
- Second shelf: 2 cabinets.
- Third shelf: all lockers are closed.
- Fourth shelf: 3 cabinet
- Fifth shelf: 1 cabinet.
This will give you the first gear (an optional puzzle item). Return to the 6th floor. Examine the right passage and find the stairs down. In the locker, take a flashlight and a note with a hint. You need to open the chest with two combinations:
- Combination on the left: 164.
- Combination on the right: 871.
Take the handgun ammo and the 5th-floor bathroom key. Go down even lower to find an improvement on the table.
Take a note next to the elevator, and also inspect the utility room (the first door from the elevator) and the far part of the corridor. In the back room, use the camera to open the chest and pick up the key to room "603", as well as the electronic board for the elevator. Before you leave, you can save your progress using the wall clock.
In the far part of the corridor, read the note, which indicates the code for the toolbox. Climb to the 6th floor and open the door to room "603". Take the cassette recorder and cassette from the box, then use the "30 right, 10 left, 5 right" combination on the toolbox. You will find a hex key. In the box by the bed, you can pick up pistol cartridges and a piece of gauze.
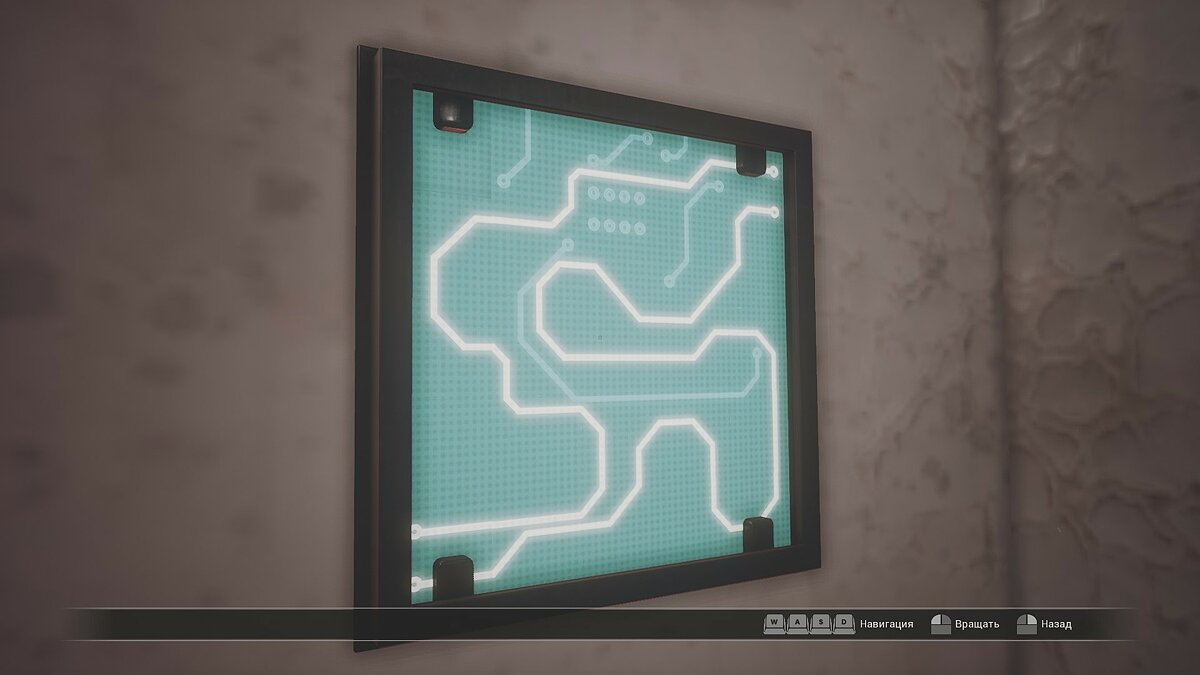
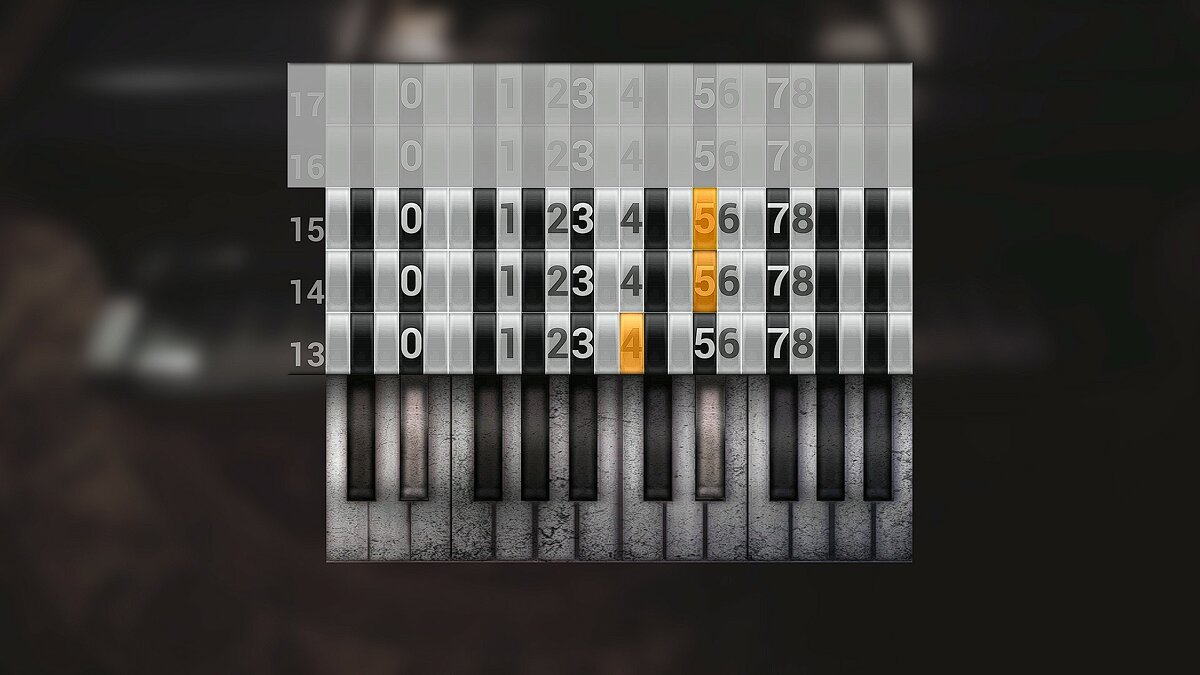
Go up to the 6th floor, use the key and insert the electronic circuit into the elevator panel. Now we have to solve a small puzzle. Place all boards as shown in the screenshot below.
How to find the gun, solve the chess puzzle and get into the hall (5th-9th floors)
In the elevator, find the button "7" and insert it into the panel. Before going up to the 7th floor, we recommend that you return to the 6th floor and inspect the chess game in the locked room (you can get here if you use the camera in front of the wall).
From the 7th floor, go up to the 9th and find a pistol and ammo. Deal with the first enemy, read the note on the table, and run to the far left side of the balcony. Take the mezzanine key "1" in the chest, and open the grate on the left. In the room, find an improvement and a chess piece. Go down to the 7th floor, use the piece on the chess table, and set the following combination:
- Pawn on "E4".
- Bishop on "C4".
- Queen on "F3".
- The queen captures the pawn on "F7".
Already at the second point, you will receive a plot item. But to get the second gear and the "Grandmaster" achievement, follow all the steps.
Take away the key from the utility room of the 6th floor and cartridges. Take the elevator down to the 5th floor. Now that you have a pistol, you can examine the left-wing of the 5th floor. Pick up gauze, an upgrade, a small bag, and memory here (The Origin of Species book). There is also a note on the shelf in the hallway.
Climb the stairs to the 6th floor. Open the back room, and take the button "1" for the elevator. There are also ammo and bandages here. Use the camera to find extra ammo.
When you leave the room, the boss will appear. You can't kill him, only stun him. Spend one and a half clips on it and run to the elevator on the 5th floor. Insert the button, and go down.
House in the forest. How to find the key to the study and the sphere
Read the note on the table, go down to the first floor and follow to the restroom. There is also a note on the table by the stairs. Inspect the cabinet in the bathroom, and take the key to the kitchen. There is a key to the cabinet on the table in the kitchen.
Climb up to the second floor. In the office, find the modular key and three nozzles for it. Combine the nozzles with the key, then go down again. Find a locked chest of drawers in the far corner. Use the symbols "Ω" (omega large), "Ÿ" (Y with umlaut), and "ω" (omega small). Pick up the fourth nozzle and revolver.
Connect the nozzle with the key and use it in the bedroom on the box: "Χ, α, ω, F".
Large hall (1-3 floors). How to find the keys to the library, meeting room, and conference room. How to open the box and find the shotgun
First, inspect the second floor for the presence of cartridges, medicines, and notes. Go down the hall, take the improvement, cartridges and go to the phone. After talking with Stephanie, take the library key and open both doors (after that, throw away the key). In the corridor opposite the door to the library, inspect the composition of the gears. This will give you the third gear.
In the opposite corridor, examine the painting with a lonely woman in black. Behind it is an encrypted document (additional puzzle).
Collect ammo and useful items in the library. Use the camera to find the Three Musketeers book (required for the gear puzzle) and open the safe from the past. Combination: "32 right, 16 left, 4 right" . This will give you a puzzle box and a pen. Here we select alcohol and gauze.
We use the box. In the first puzzle, turn the disk inside, then the central and outer disks.
We combine the box with the handle, take the hint and solve the second riddle.
We can temporarily put the cube in the chest - it will be needed later. We get a modular key. We combine it with nozzles and open the box in front of the safe. So we get the key to the negotiation room "2".
We find a meeting room on this floor and select the button "3" for the elevator, cartridges, another cassette, and an improvement. On the way back to the elevator, new monsters will appear. On the third floor, there are ammo, a small bag, a shotgun, a note, and a conference room key. There are also shotgun shells and an upgrade on the flight of stairs.
How to kill a spider in the conference room (1st floor)
Before you go down to the conference room, prepare for the battle with the first boss. Take all weapons, ammo, and first aid kits. Open the second room on the first floor to the right of the elevator. Take the ammo here and open the box. Inside there will be a screen and a hint.
At this point, the first boss will appear. There are no specific recommendations to be singled out. Use available weapons to kill him. If you run out of ammo, check the tables and crates in the hallway.
How to solve the screen puzzle and open the third part of the cube
Combine the screen with the cube and look at the clue. You need to make a combination, as in the picture. Use the screenshot below. Put the cube back in the chest, as it will come in handy later.
Where to get the blue keycard (7th floor)
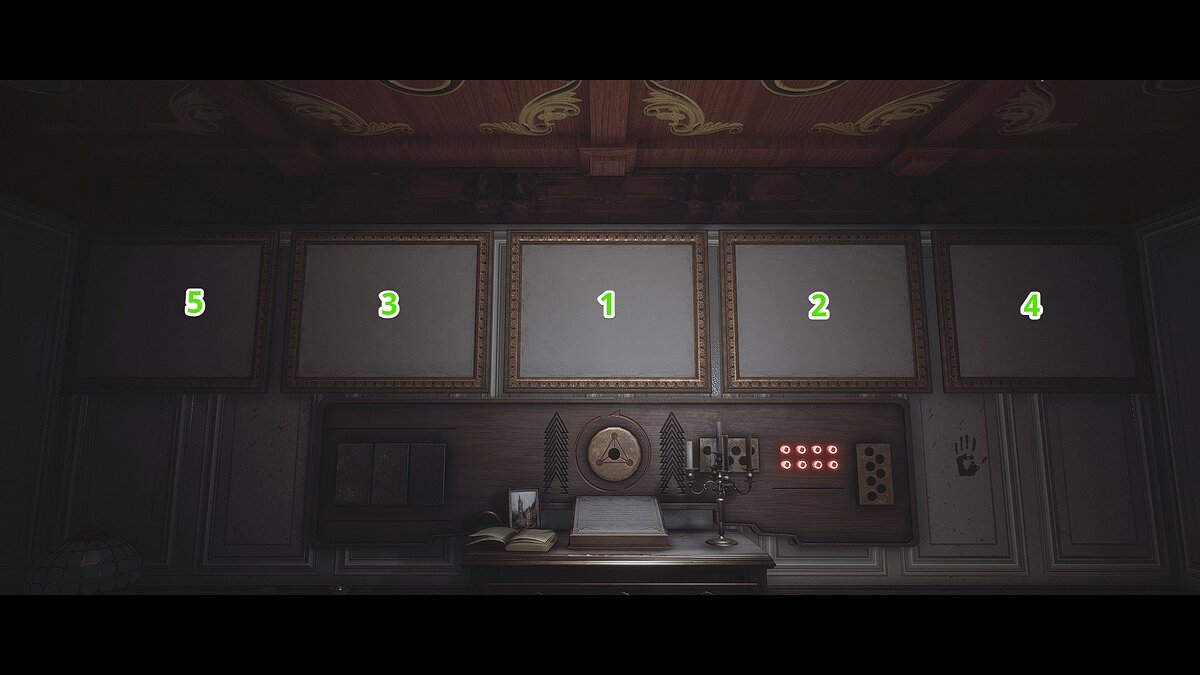
Climb to the seventh floor and use the key on the door on the right. At the end of the corridor, take the upgrade, the cassette in the box, as well as the first aid kit and ammo in the large drawer. There is also a note here. Read the inscription in front of the paintings to activate the script. You need to interact with them in the correct sequence (from left to right):
- First (tower).
- Fifth (several people).
- Third (two men).
- Second (one man).
- Fourth (ship).
Now open the door to the opposite wing and solve a similar puzzle. Pictures can only be seen with a camera. Here is the correct sequence of pictures (from left to right):
- Third (swords).
- Fourth (two men).
- Second (woman).
- Fifth (male).
- First (hanged man).
Don't forget to pick up machine gun ammo here, go through the wall, and pick up useful items and a few upgrades. There is a crowbar in the toolbox. In the same room, you will find a cabinet with ammo and a memory (ring).
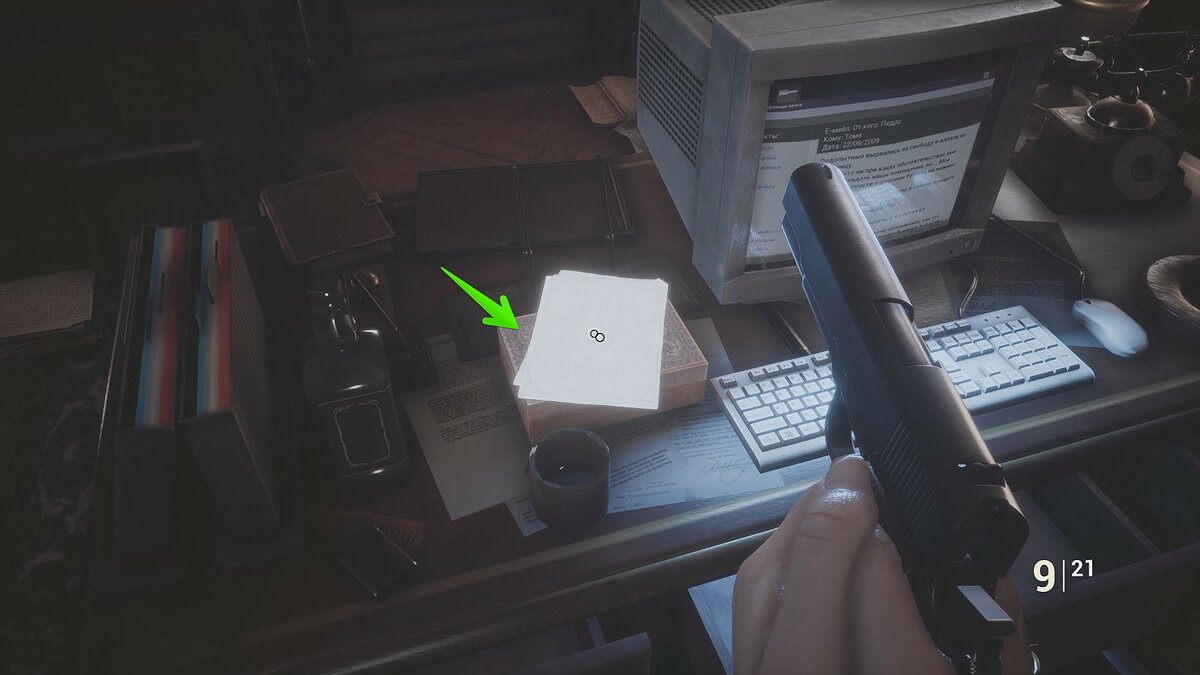
Take the elevator down to the 6th floor to use the crowbar. Now he is not needed. Put it in the chest and return to the 7th floor. If both puzzles with paintings are solved, then a passage to the office will appear opposite the stairs. Here is an upgrade, shotgun shells, a note with codes, and a blue key card in a box. You can also read Pedro's emails on the PC screen.
Take the elevator back to the 6th floor. Use the red keycard and the code "775492" to open the grate. In this room, pick up an improvement. Go down the stairs to the 5th floor, and use the blue key card and the code "645820".
How to solve the additional puzzle with gears and the Three Musketeers book (5th-6th floors)
If you followed the guide and found all the necessary items for the puzzle, then it's time to start solving it. First, use the camera and open the lower cabinet doors. Use the "19 right, 17 left, 24 right" combo on the safe to get an upgrade, ammo, and a small bag.
Recall that before this you should find three gears and the book "Three Musketeers":
- The book is in the library on the 1st floor. You need to use the camera to find it.
- The first gear can be obtained from the box on the 5th floor (puzzle "There is a certain sequence here").
- The second gear is in a pedestal under the chessboard on the 7th floor (chess puzzle).
- The third gear in the painting is on the 1st floor, opposite the entrance to the library.
Pick up a camera and place the book "Three Musketeers" on the bookshelf. In the room, you can find an improvement (+5) and a console. Here is the correct sequence (from left to right):
- goog_2129294066One day of Ivan Denisovich.
- "A Tale of Two Cities".
- "Bermuda Triangle".
- "Three Musketeers".
- "Slaughterhouse-Five".
- "6 years".
- "The Seven Deadly Sins".
Examine the painting to the right of the grate and click on it. Use the gears here, then make a "TFM" combination. FOBIA will appear on the console in the secret room. You need to substitute each letter from this word into the first gear, and at the output get a letter from the third gear. Correct combination: "YHUBT".
If everything was done correctly, you will receive the achievement "Mechanic" and a note. Exit to the corridor and go up to the floor above. Kill three spiders, take the key to the grate and open it. Now you can move between floors on block "A". Here, find the improvement (on the right behind the crate).
How to find the machine and defeat the pianist
Go down the stairs to the 4th floor. Kill a few monsters and go down the corridor to the office. Take ammo before exiting the corridor. As soon as you find yourself in block "B", a cut-scene will start.
Go down to the 2nd floor through the gap and use the camera to go through the wall. On the windowsill, there are cartridges for the machine gun, and two monsters will be waiting in the corridor. Kill them and follow forward along the gap to the 4th floor.
In the first room, examine the closet. Inside lies a memory (pendant). In the restroom, you can find an upgrade (in the bath), and in the next room, you will find an assault rifle, ammo, and an upgrade.
Examine the last room. Here you will find ammo, an upgrade, as well as a box with a riddle. Correct combination: SIMAO. You will get access to room "709" (a piece of metal ) and the key to room "404".
Prepare for the battle with Achilles (the main boss) and go down to the 2nd floor. As usual, stun the enemy and run into the corridor. After the cut-scene, the path to the 1st floor through the stairs will open. Go downstairs, and call the elevator. While the elevator is moving - kill zombies and hide from the boss. Run into the elevator and go up to the 7th floor. Use the key to room "709", then take the camera and pick up the metal rod.
Find a retractable ladder on the ceiling and climb up. Search the dressing rooms. Find ammo, alcohol, and a white keycard. Use the card and the code written on the wall: "9568".
In the hall with the piano, you will meet the second boss - the pianist. It's very easy to kill him. The main thing is to keep moving. He usually attacks with a lunge, so you need to stay away from the monster. If you managed to dodge the blow, then use a shotgun. After the battle, you will receive the achievement "Pianist".
Inspect the hall, and find cartridges and first-aid kits. Apply for the key card again with the code "5527". Go around the hall behind the bar and find the memory (music sheet). On the top floor, take the key to the room behind the scenes and use it to open two bars. After that, throw away the key, pick up cartridges, cassette, and button "8".
Go down to the elevator, insert the button and go up to the 8th floor. To open the door to the corridor, use the white key card and enter the code: "1102". Now you can throw it away.
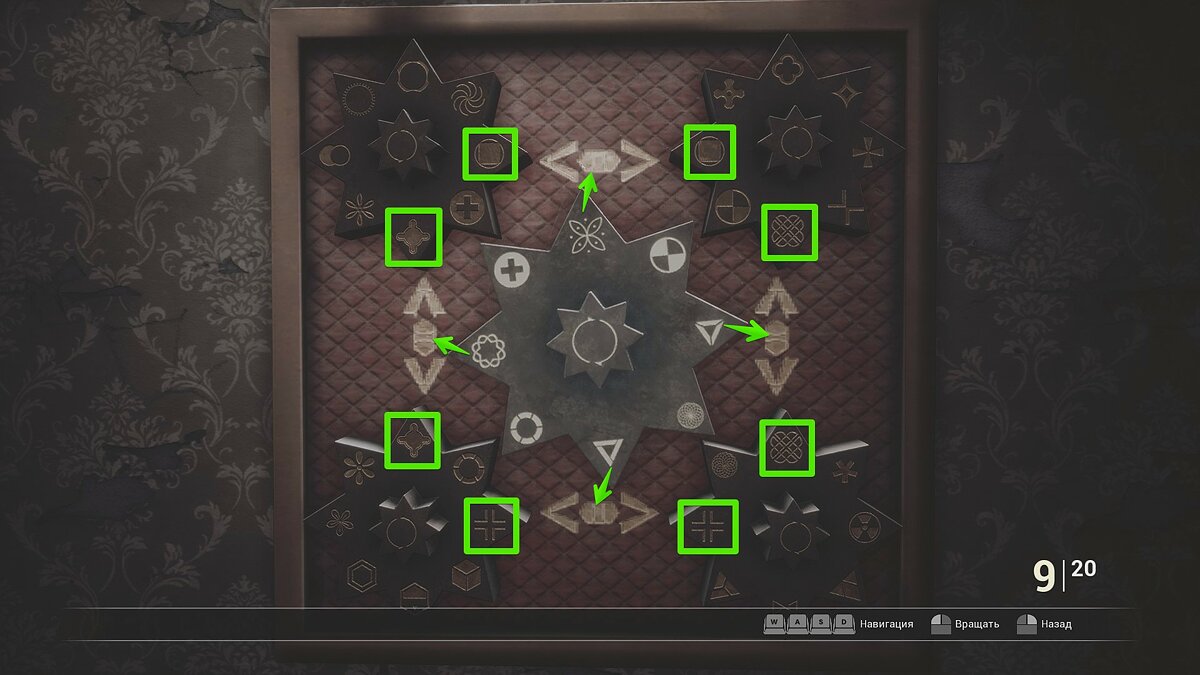
Go up to the door to the administration and take the handle of the cash register, as well as a note from Stephanie. Insert the handle into the cash register, and take the key to the mezzanine "2". Open the right grate on the balcony and solve the puzzle. Use the screenshot below.
You will receive a key to the hotel lobby. Go down to the 1st floor, and open the door with the key. Read the guest list at the reception, pick up the bandage and inspect the bar (door on the right). In the bar, find Pistol and Shotgun Ammo and a Memory (MP3 Player).
Return to the hall and approach the blockage to the right of the reception. Pick up the camera to overcome the obstacle. Look for the upgrade in this room. Open the box with the electronic circuit and the administration key. When you do this, the reception phone will ring. Pick up the phone and get ready for another meeting with Achilles.
How to escape from Achilles and fix the elevator
Climb up from the lobby to the first floor. You will immediately notice that some passages are blocked. You can use the library as a shelter - Achilles will not enter inside. You need to get to the elevator, activate it, and immediately run to the 4th floor using the stairs (through the faults on the 2nd and 3rd floors). On the 4th floor, use the electronic circuit and make a combination, as in the screenshot below.
Where to find cutters. What doors can be opened
Don't rush into the elevator. Open the door to room "404", and find a memory (magic cube), wire cutters, and an improvement in the closet. You can use them to get into the following rooms:
- Number "604". Here you need to solve a small riddle. Take the camera and look around the bathroom. Find the code "251", and apply it to the safe. There will be a key inside . Take the camera again. In the past, open the locker with the key and take the upgrade (+5) . Other than that, the room also has a memory (stethoscope) , a first aid kit , a piece of gauze , a band- aid , and shotgun shells (look at the bottom of the tub with a camera).
- Access room on the 5th floor. The room contains an improvement and a first aid kit .
- Number "501". Use the camera to enter the room. Look around the room and find the combination to the box in the past "483" ( upgrade +5 ). Here, take an improvement , alcohol , shotgun and pistol cartridges .
How to open the safe in the administration room and get the fourth nozzle on the modular key
Go up to the 8th floor. Use the key to get into the administration room. Take the camera and examine the safe by the fireplace. The combination is shown right on it: “35 to the right, 5 to the left, 30 to the right” . This will give you piano keys and a small gear . Also collect ammo and upgrades here .
Combine the gear with the cube and solve the last puzzle to get the fourth key cap. You can now open all locked boxes in the hotel.
How to solve the bowl and coin puzzle
Start with the casket in administration. Inside there will be an upgrade and a locked box. Code from the box: "784" (we picked it up manually). Take the coin . Go down to the statue and shoot the bowl in Christopher's hand. Pick it up and set it above the fireplace. A slot will appear in which you can insert a coin. After that, a secret passage with an improvement and a note will open in the main hall .
How to open the safe on the 8th floor
Behind the bar in the locker there is a safe. You will find a hint to it in the drawer of the library. Use the code "1649" to pick up pistol and revolver ammo .
What other safes and chests can be opened with a modular key
Once you get 4 nozzles, you will be able to open a few more safes and chests. Here is the complete list:
- Safe in the office on the 7th floor - improvement +5 .
- The box in the room "610" (start number) - improvement +5 .
- Library box - +5 upgrade , revolver ammo .
How to open a drawer in the library
Go down to the 1st floor and enter the first room to the right of the elevator. On the left you will see a locked safe, and a little to the right a canvas with two large coins. You need to turn them logo side down. Do the same with the camera in hand. You will receive an improvement (+5) and a coin with the correct combination: "25 right, 15 left, 20 right" .
In the drawer you will find a photo of the safe on the 8th floor (we already opened it), as well as the key to the additional section in Stephanie's safe . Here lies a note and a memory (gold earring) .
How to find a revolver. Where to use the metal rod
Follow to the 6th floor and run into the passage, where you first picked up a flashlight. There are handprints on the wall here that point upwards. Use the metal rod to open the ladder. Upstairs you can find an improvement .
Now go down the stairs to the 4th floor. On the opposite side, you will also find a retractable ladder. Lower it, take away the revolver , cartridges and improvement . By opening all the stairs you will receive the achievement "Spread" , and the metal rod can be thrown away.
How to Solve the Enigma Puzzle (Updated)
At the moment we have not found all the details of the puzzle, but we will update this guide soon.
How to solve the piano puzzle and open access to the laboratory
This is the last thing we recommend to do in the hotel. After you leave the inn, it will be impossible to collect missed items and upgrades. If you have solved all the riddles, then go to the hall with the piano and insert the found keys. Use the combination: "0-1-1-2-3-5-8-1-3-2-1-3-4-5-5" .
Go down the passage under the statue, inspect the drawer and take the black key card . Use the code "400233" and open the passage to the 7th floor (optional). Unlock the elevator to the lab and go underground.
Forest. How to collect all parts of the sphere
Hold RMB and follow the indication of the sphere. Find 2 pieces , then examine the house. Open the chest containing the warehouse key and read the note on the table. In the warehouse, pick up 3 pieces of the sphere.
Get to the next house and read another note . Enter the right building in front of the settlement entrance and run towards the chapel. Follow the path down. Ignore the house on the right as it has no useful items. In the barn, use the combination "35 right, 15 left, 10 right" on the toolbox and collect the wire cutters . In the drawer, find the 4th part of the sphere.
Return to the chapel. Use the wire cutters on the locked gate and examine the first house. In the cabinet you will find a memory (miner's helmet) .
Unlock another gate. There is a note in the house on the right , and on the far right side of the location you will find the key to the chapel . You need to use the stairs to get here.
Open the chapel. After the cutscene, use the modular key on the box to get the 5th orb piece . Go back to the settlement entrance and use the wire cutters on the last locked gate. Go around the house (there is nothing inside) and get to Matthias' hut. There is a note on the table , and in the locker on the wall there is 6 part of the sphere. Run along the road to the mine and take the last piece of the sphere.
Underground premises (laboratory). How to get access 1, 2 and 3 levels. Where to find a flash drive and which server to choose
Run forward and to the left. Find the second door on the left and enter the lab. Kill the monster and two spiders, examine the room. There are cartridges and a piece of gauze here . Go to the adjacent corridor, kill a few spiders in the passage on the left and go back. Use the camera to get through the barrier.
Gather ammo , bandage and a piece of gauze . Read the note on keycards and dossiers on the table . Interact with the computer. Print the Level 1 Keycard and read the documents .
Return to the elevator, enter the door "N-1". The first entrance to the observation deck is locked. Go around it and go on the other side. Collect pistol and shotgun ammo , and run the key generator on PC. Take the flash drive and go back to the main PC.
Insert a flash drive, activate the level 2 generator. At this point, an error will appear on the screen and a request to access the servers. Click Yes . A door will open behind you. Enter the server room and use the camera to find a screwdriver .
Return to the monitor room and go forward. This is where the operating room is located. Collect useful items and use the screwdriver to complete the puzzle.
There will be three servers on the table. You need to choose the one labeled "A19" . Insert it in place of the failed module and print out the Level 2 Access Key .
Take the flash drive from the PC and head to the "02" laboratory. In the room you will find some bandages , ammo and a note . There is also a safe here. It is needed to solve the puzzle in the general transporter. Code: "25 to the right, 8 to the left, 36 to the right" . Take the metal ball .
Pick up the camera, unlock the box with the modular key. Get +5 upgrade and revolver ammo . Walk around the room and move the shelving to get through. Go back and go to the next room using the camera.
Kill two monsters, inspect the room with the camera. Here you will find a note and a memory (photo) . Generate a Level 3 Access Key and run through the door on the left. In the corridor you will meet with Achilles. Go around it and head to the server room. Print out a level 3 access card (you need to solve a mini-puzzle and collect the same geometric shapes).
How to open the door to the common transporter, find and synthesize "Gas 320"
Leave the server room through the front door and watch the cut-scene. After that, you can go down to the lower level and examine the chambers for experimental subjects. Find the diary of the deceased , which we hid at the beginning of the game. The key to the camera is on the wall behind the table (with a camera in hand). In the adjacent chambers are a memory (rose) and an improvement .
Exit to the corridor and follow to the right. There will be a passage behind the door, where you can enter using the camera. Here is an improvement , a small bag and a memory (watch) . Use the level 3 access key on the door and enter the code: "852369" . From the corpse, pick up the key card from the laboratory with a common conveyor. Interact with PC. Click on the numbers in the following order (from left to right):
- goog_2129294090When the number "4" appears.
- When the number "9" appears.
- When the number "9" appears.
Run back and enter the lab. It makes no sense to describe all the actions. You need to get to each floor and activate one button at a time to unlock the main door.
Also inspect three large rooms. In them you will find three substances and two empty flasks, from which you need to synthesize "Gas 320". This is done in the laboratory at the lowest level.
You can find a lot of ammo , medicines and notes in this location . In addition, there is a memory (Petri dish) in the room with the synthesis device . When you find all the substances, install them in the device.
Blend #1:
- Batracotoxin: 30%
- Plasmodium: 20%
- Ciclosporin+CelulasM: 50%
Blend #2:
- Batracotoxin: 80%
- Plasmodium: 15%
- Ciclosporin+CelulasM: 5%
How to kill Achilles
Go back upstairs and examine the place where Achilles recently lay. Pick up the memory (broken gas mask) . Go around the building and get to the observation room. Unlock the airlock on PC and get ready for the final battle.
If you have a revolver and at least 10 rounds for it, then take this weapon. Also grab a shotgun. To the left of the entrance to the large hall, take the note and take the gas mask on the rack. Put both mixtures into the atomizer and fight Achilles.
The boss is very slow, so keep moving and attacking him. When he falls to his knees - use the valve. Repeat the steps twice to kill the enemy.
Choice. What are the endings and what does the decision affect
The following guide contains spoilers. Make sure you want to know the consequences of the final choice in Fobia - St. Dinna Hotel.
What happens if you shoot Christopher?
Roberto will try to shoot Christopher, but it will not work. The man will pick up a knife and kill the hero. A little later, we will see that Christopher will return to the past to test Roberto again. This will continue until the guy agrees to cooperate with the leader of the sect.
What happens if you join Christopher?
After this choice, you will immediately receive the achievement "Miner". Christopher will tell you about a girl who arrived in 2060. She also calls Roberto her father. Apparently, the sect's experiments led to a global cataclysm, prompting Roberto's daughter to go back in time and correct her father's mistakes.
The orb that Christopher found in the mine prevented her from doing so. He locked the girl in a cistern to control and use her abilities.










Comments
Post a Comment