A detailed walkthrough of all story missions, side missions, the elimination of additional targets, a map with the location of all collectibles
Before setting out on your mission, take a look at the map below. It displays all the main points:
- Yellow labels are the main tasks.
- Red marks are targets for elimination.
- Green tags are collectible items (which we talked about in a separate guide).

The most important places on the map
Processing plant - No.4 on the map

You need to get to this building at the end of the opening act. Carl will save an interrogated member of the resistance. Shortly after leaving the factory, you will reach a point where the rest of the map will be unlocked. An alternative starting position for this mission will appear. You'll also find an armory with lots of weapons and supplies, and the first workbench to upgrade!
Radar - No. 6 on the map
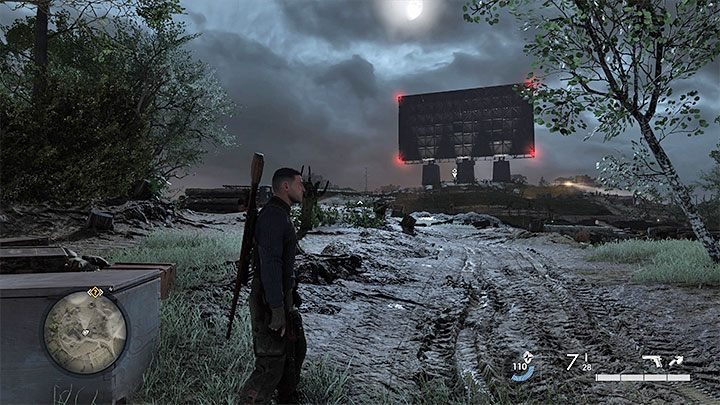
A large radar tower located on a hill and associated with one of the main objectives of the mission. You can get to the radar from the south or through the tunnel, but beware of the sniper. You can go to sabotage: overloading the generator or destroying supports.
Resistance Vault - #7 on the map

This is another place related to the main task. Here you need to get rid of the enemies in the shelter, and then carefully inspect the shelter to find a safe with important documents. The key to the safe is hidden in the attic, which can be climbed through the vines.
Entrance to the tunnel - No.12 on the map

Using the tunnel is an alternative way to get to the radar mentioned above. While moving through the tunnel, you will encounter 1-2 enemies. This is much safer than moving through the trenches south of the hill (read below).
Trenches - No.13 on the map

They are located south of the radar tower (the main target) and the bunker directly below it. Passing through the trenches is an alternative to the tunnel. But in this case, you need to try not to stick out, because there are many enemies here. In addition, you need to find an officer to get the key to the bunker and get inside.
The beginning of the first task is linear. Make your way through the southeastern parts of the map by following a series of simple steps. Fortunately, after completing the initial objectives, you will unlock free movement around the map. So it will be in all subsequent tasks (with a few exceptions).
There will be many open areas. On the one hand, they make it easier to pass, since you can use binoculars and a rifle to eliminate enemies from a distance, from a safe distance. On the other hand, you need to act as carefully as possible, because there are practically no shelters (I recommend hiding in tall grass). The good news is that there is only one enemy sniper in this mission.
There are four starting points. If you are going through the task for the first time, you will have to start on a submarine. Complete the training and soon you will reach the shore. You will be able to unlock new potential starting points by reaching them on the map. Then it will be possible to select these positions when re-passing the mission. To, for example, get to the main goals faster.
The first task has several required and optional objectives:
- Clean up the beach . This is a mandatory starting task that requires destroying searchlights, crossing the beach, and rescuing a member of the Resistance.
- Disarming the radar . Another important task. There are two ways you can sabotage the radar, and we detail both in the guide below.
- Obtaining information about the Resistance . The next main objective of the mission. You must find and search the resistance hideout and retrieve the documents.
- side missions . In the first task, there are three additional missions related to the destruction of Nazi objects.
- Steffen Beckendorf is the officer you are asked to liquidate. This is an elite enemy. A test is associated with it, for the successful completion of which you need to destroy Steffen with an explosion.
- Meeting with Charlie and evacuation . You can evacuate only after completing the main tasks.
In the first task, there are 19 collectibles. These include 3 workbenches, artifacts and various documents. The location of all these items is shown in the screenshot above. You can also check out the separate collectibles guide in the first mission of Sniper Elite 5.
Protecting the Beach and Helping the Resistance
Neutralize spotlights

The first task "Neutralize Searchlights" is part of the Sniper Elite 5 tutorial system. You will receive this task while on board the surfaced submarine. First, equip your binoculars and mark all the enemies at the spotlights. Once the targets are marked, switch to the sniper rifle. Shoot those spotlights. During this task, you need to hold your breath to ensure the most accurate shots at a distance. Bullets pierce both searchlights and enemies standing behind them.
Clear the beach
After the cutscene ends, you will be on the beach. Next will be a line segment. As for free movement, it will be available, but a little later. Explore tooltips that will let you get acquainted with various in-game mechanics. First, use squats, then you will need to climb. The last action can be performed if there are interactive vines that allow you to get to hard-to-reach places. After you find the first bodies, you can search them for additional weapons. When you're ready, roll down the steep slope.

Now you need to act covertly. Don't forget to crouch and use the tall grass to reduce the chance of detection (note - the grass only partially hides you, but you can still be detected). You will also learn how to stun opponents - by approaching from behind, you can kill or stun the enemy. Soon you will reach the boathouse and receive a task to protect it. Use focus to scan an area and mark nearby enemies. To detect enemies, you can also follow the radar (enemies will be marked with circles) or use binoculars. Ultimately, you should reach the area to the right of the building. Sneak up on the enemy officer and kill him. Take the boathouse key from his body and open the nearest door.
Explore the refinery
A new objective will appear related to searching the processing plant. Nearby is a car with an enemy crew. You can try to kill all the enemies before they leave the vehicle (by throwing a grenade, for example) or wait until they all disperse in different directions. The second option will allow you to perform a series of silent kills, eliminating the enemies one by one. In any case, you need to completely clear the action area. Then you need to climb the nearest hill. Either follow the winding path or climb the vines. There is an enemy at the top of the hill. You can sneak up on him or shoot from below.
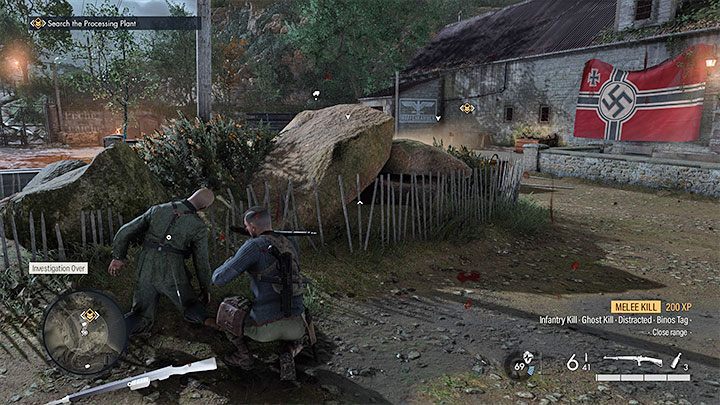
There is a parked truck near the processing plant, and enemies around it. Explore the area with binoculars to mark all targets. As you move towards the refinery, you can hide in the grass and distract opponents by throwing bottles. A broken bottle draws attention and forces enemies to leave their posts (a great way to split up groups). Such opponents become easy targets. To avoid alarm, move the bodies of the killed opponents to the grass. After the area is cleared, go to the entrance to the building, where a cut-scene will start in which Carl will meet with a member of the Resistance.
Inspect Equipment

Explore the building where the ally was kept. You will find a bolt cutter and a locked door leading to the armory. To open it, you can use a lockpick (in Sniper Elite 5, lockpicks do not break) or break the lock with a bolt cutter (but in this case you will make noise and attract the attention of opponents). There is one opponent in the open room. Kill him. The armory will contain various supplies (including special ammunition with certain properties), a sniper rifle with increased lethal force and the first workbench (it can be used to modify weapons and install new clips, barrels, handles).
Back to route

Now you need to get to the viewpoint. Exit the armory and follow the linear path leading through the caves. You must reach the area, where you will be able to freely travel around the region. To complete the task, it is enough to neutralize the flag and collect information about the resistance, but there are additional goals. You can do all of these in any order!
Neutralize radar
Get to the radar

Neutralizing the radar is one of the two main objectives of the first mission. You will learn about the radar tower after completing the first stage of the mission described above. The location of the radar will be marked on the map (in the northeastern part of the region). There are several ways to get to the radar. Before you do this, deal with the sniper who is sitting on the hill next to the radar. Be sure to locate and mark it with binoculars before approaching the target. After that, you can shoot him from a distance (aim carefully, since the enemy is quite far away), or stay out of sight of the enemy and deal with him in close proximity.

The more obvious path to your objective leads to the radar tower from the south. There is an asphalt road and trenches. Since you are in a large open area, be sure to hide in the trenches so that the sniper and other opponents cannot detect you. Follow the trenches, pay attention to the radar and react to the circles indicating the location of the opponents. Also use focus to find individual soldiers.

The hill with the radar is surrounded by barbed wire, which complicates the task. In fact, you need to go through a bunker located at the base of a hill with a radar tower. The entrance to the bunker is locked, but there is an officer standing nearby who has a key. Find it with binoculars, and then eliminate it, take the key and open the bunker door. Once inside the bunker, carefully look around.

There is another, alternative way to the hill with a tower. It is less obvious, but much more secure. You need to go through the tunnel at the back of the hill with the radar. Be careful with the machine gun point. Destroy enemies or divert their attention. Inside the tunnel, you will encounter one or two opponents, so getting rid of them will not be difficult. You should eventually get to the back of the radar. There will be another hill here that you can use to hide and surprise opponents in the area.
Now you need to destroy the radar tower, and there are several ways to do this.
Option 1: destroy the supports
This is one of two possible options for completing the task (alternatively, you can choose option 2, described below). It involves the use of explosives to destroy the radar. Near the radar, you can find several charges at once. In the area behind the radar, you can easily detect two explosives.

Head up the tower hill and use the stairs to get to the lower balconies. Continue climbing up using the ledges marked with yellow paint. If necessary, move sideways. Your goal is to reach the upper balconies on the radar. Find another ladder to climb even higher. Soon you will find yourself on the upper balconies. There are supports on which you need to install two explosives. After planting the explosives, select the Light Fuse - Slow option so that you have enough time to evacuate.

Get off the tower using the rope to climb down. After returning to the area behind the tower, wait for the explosives to detonate and the task will be completed.

Option 2: find a radar power source
An alternative way to destroy the radar (option 1 described above), which involves overloading the generator that feeds the radar and sabotaging the fuse box, which will disable the radar. If you chose option 2, go to the bunker under the radar tower. If you get to the radar in front, you need to get rid of the officer and take his key. A less obvious path (the one that leads through the tunnel) will allow you to access the bunker without a key.

While exploring the bunker, look into the small rooms. In one of them you will find a crowbar. Once you get the crowbar, get to the engine room. Use the item to overload the generator located here. Finally, you must go behind the bunker. Move along the power lines until you find the fuse box. Interact with him to sabotage the radar. As a result, a cut-scene will start, in which they will show that the radar is disabled.

Recovery of information about the Resistance
Find the Resistance hideout

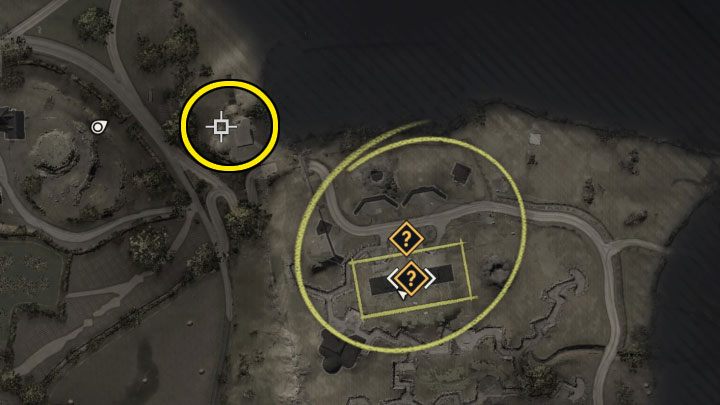
Another main task of this mission is to obtain information from the headquarters of the Resistance. You can complete this mission immediately after completing the tutorial, or after destroying the radar. In addition, the marker with the Resistance shelter will not appear on the map immediately. You will automatically detect it when moving around the territory. You need to get to the main city. The building you are looking for is in its southwest corner of the map.

You can approach the shelter - the yellow building - from two sides: from the east or northeast. Both options involve moving along the main streets of the city, so you should get rid of some opponents in advance. In addition, it would be great if you eliminate Steffen Beckendorf in advance. This character patrols the city by default in his vehicle.

The headquarters of the Resistance is occupied by enemies. You can try to destroy them from a distance or deal with them covertly by moving closer to the building. In the latter case, carefully scan the area and distract enemies. For example, throwing bottles.
Retrieve information about the Resistance

Enter the building and use the stairs leading to the second floor. In one of the bedrooms you will find a safe hidden in the floor next to the bed. It can only be opened with a key. Leave the building and examine the front wall. Find creepers and climb up. You will reach the shutters leading to the attic, where you need to examine Marcel's corpse. This is how you get Marseille's key. Return to the lower floor through the hole in the floor. Remove all boards slowly or use a crowbar. Crowbar break boards faster, but this action will cause more noise. Return to the safe, use the received key and get the necessary information.

side missions
Neutralize the Coast Guard
You need to destroy some Nazi fortifications:
- 2 bunkers located in different parts of the beach east of the city - #1 and #2 on the map above.
- 1 artillery battery in the city - #3 on the map above.

Information about this mission will appear in the journal as you get closer to one of the three objects listed. Near each of the bunkers there are several enemies. If you want to avoid a direct confrontation with them, hide in cover and lure out enemies by throwing bottles. There is also one explosive near each bunker. Take it and enter the bunker, get to the marked place, set the charge, light the fuse and run outside before it explodes.

The artillery battery is located in the western part of the city, near the Resistance shelter. You must enter the respective building and use the stairs to reach the top floor. There you will find a target that can be blown up with explosives found nearby.

Destroy an artillery battery

Another artillery battery is located in the enemy camp in the northwest corner of the map. You can learn about it from intelligence or if you get close to the location of the battery. Here you will find a large group of enemies. Watch out for the guard at the lookout tower. Going through the main entrance to the enemy base is a bad idea. Instead, look south of the base for an alternate passage under the barbed wire. You need to duck or lie down on the ground to sneak into the territory.

In a small building to the west you will find a bolt cutter, which you will need later. Ultimately, you need to get to the central building of the enemy base (blue marker) - traces lead to it. Inside a building with enemies (can be bypassed or killed), find an ammo room. Interact with one of the missiles to attach a grenade to it. After that, run to the exit, which you can open with the bolt cutter you found earlier. There will be an explosion that will destroy the artillery battery.

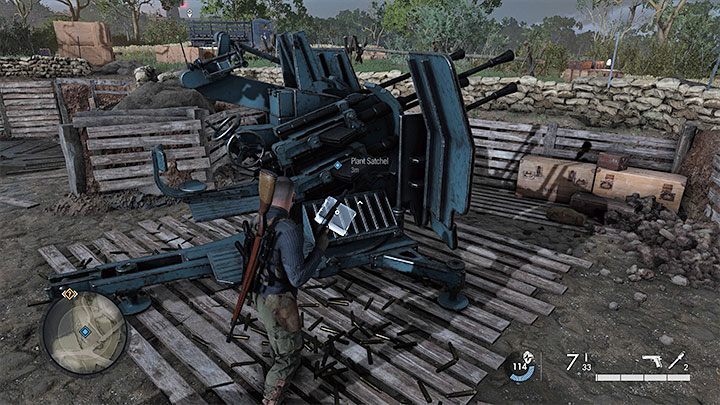
Destroy anti-aircraft guns

Three anti-aircraft guns are located in the northern part of the map. You will learn about them if you get close to at least one of the guns. The location of anti-aircraft guns is shown on the map above. You can blow them up in any order. There will be a few enemies next to each, but most can be killed with shots from afar. The scheme of the operation is simple - find the explosive next to the anti-aircraft gun, then install it on the gun, light the fuse and move to a safe distance.
Steffen Beckendorf
Find a target from the list

Steffen Beckendorf is the first target on an optional kill list. This is an optional quest, but if completed by killing an enemy in the correct way, it will unlock the Machine PIST.40 secondary weapon. This enemy moves around the city in a car located in the southwestern part of the map. Use binoculars to mark a target and make it easier to track. Beckendorf's car travels along a predetermined route, periodically stopping.

Kill Steffen Beckendorf
To unlock the reward, you need to kill Steffen Beckendorf with an explosion. The easiest way is to install a mine on the route of transport. Try clearing the east part of the city first so that the target doesn't know anything and you can safely approach the road that runs through the city. Select a mine in inventory and place it on the road (one or more to reduce the chance of a car passing by). The explosion will destroy the vehicle and kill the target.

Mines can be taken in advance, before the start of the mission. They can also be found in supply containers or when searching downed enemies. An alternative option is to get to the pier, located south of the city. There you will find a Panzerfaust grenade launcher. Take one and shoot the vehicle.

Charlie and the evacuation
You can leave the mission area after you disable the radar and collect information about the Resistance. It is not necessary to complete side missions or eliminate Beckendorf. Take your time, because there are 19 collectibles hidden in this place at once, and we talked about them in a separate guide.

To finish the level, you need to get to the farm in the western part of the map. It is best to start in the city, go north and turn west as soon as possible. Take your time, because the building adjacent to the extraction point is occupied by an enemy who is looking through the area through the upper windows. You can kill him with a shot from a distance or sneak into the building from the north side. The quest will end after you reach the shed and go inside.
Comments
Post a Comment