We tell you how to complete all the story and side tasks, eliminate targets, successfully evacuate, find all the keys and open all the doors
Before setting out on your mission, take a look at the map below. It displays all the main points:
- Yellow labels are the main tasks.
- Red marks are targets for elimination.
- Green marks are collectible items

The most important places on the map
Crossing the river - No.3 on the map

Crossing the river will give access to the path on the right side leading to the castle. This is the best way to get to the castle since you can easily get rid of all the enemies at the crossing (for example, you can set up a sniper's nest in the building south of the river), and also get to the entrance to the old tunnels, through which you will already get to the enemy base.
Eastern Farm - #4 on the map

The right road will take you to the east farm. She is guarded by several enemies, including a sniper hiding in the attic of one of the buildings. After clearing the area, you can unlock the workshop and find the key to the old tunnels. There is also a stable nearby that you can unlock as a new starting point for this mission.
Entrance to the old tunnels - #5 on the map

Using the old tunnels is the best way to get into the castle (the main building of the mission). The tunnels will allow you to pass under the enemies guarding the building and reach the poorly guarded moat. The entrance to the tunnels is locked, and the key to it can be obtained at the eastern farm. Alternatively, you can blow up the door.
Main gate - No.8 on the map
The main entrance to the castle is an obvious (in terms of entering the castle) and well-guarded place. If you still want to use it, attack the enemies from a distance - those who stand in front of the gates, and those who stand on the balconies and at the shutters of the main building.
Sniper Point - #12 on the map

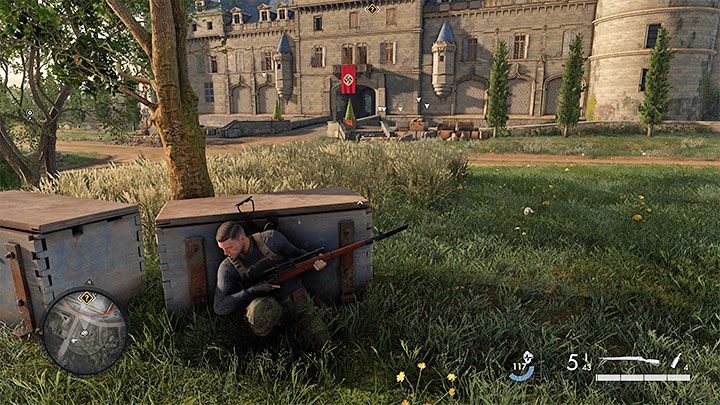
Behind the castle, there is a small building with an enemy sniper hiding inside. If you ignore it, you will face big problems in the future (even during the evacuation). We recommend that you get into this building and eliminate the sniper (search his body - he has one of the items associated with the side quest).
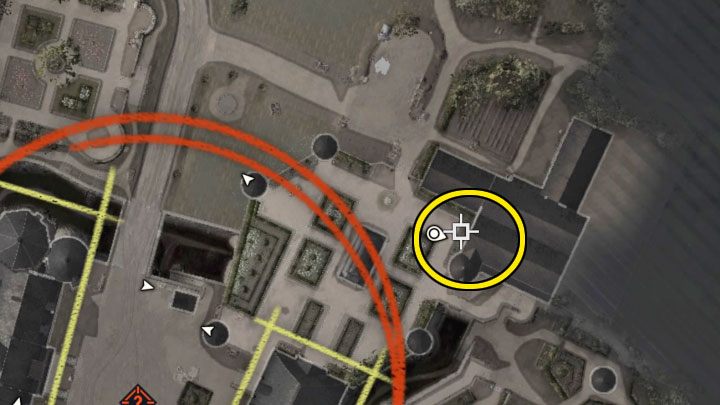
Meller's office - No.14 on the map

The office is the most important room in the castle, but you have to be careful because there are some elite soldiers at the entrance. Three paths lead to the office - through the front doors, a hole in the ceiling, and open shutters. In the office itself, you need to find a switch that opens access to a secret room with documents.
general information
The main area of the second story mission of Sniper Elite 5 is the castle, which will have to be carefully explored. This is a multi-storey building surrounded by a moat. Also on the map there are several farms, gardens, and forests. You will start the second level at the opposite end of the map, which means that you have to overcome a long way to the castle. Three paths lead to the destination, and two of them (western and eastern) will not cause any special problems.

Problems may arise with the penetration into the castle. Still, this is a restricted area with many enemies both inside and outside. However, you will have several ways to get into the castle, as well as find an office with documents. Finally, there is a sniper at the back of the castle who has a good view of the main courtyard.
There are three possible starting positions in this mission, but on your first playthrough, you will start in the forest in the southern part of the map. To open new starting points, you need to explore the location and interact with them.
This quest has several main and side objectives:
- Infiltrate the castle. But first you need to get to the castle itself. There are three different routes to get inside.
- Entrance to the office. Meller's office is the most important room in the castle. There are also three ways to get into the office and its secret room.
- Side mission. In the second mission, you can complete only one additional quest related to the search for stolen antiques.
- Friedrich Kummler is the only target to be eliminated. Below we describe how to go with Kummler to the ballroom and drop a chandelier on him.
- Evacuation is the final part of the mission. In our guide, we will cover all the potential dangers that you may encounter during the escape.
In the second task, you can also find 19 collectibles - three workbenches, documents, artifacts, and so on. All of them are marked on the map above with green markers.
Infiltrate the castle and find Meller's office
Get to the castle
After the start of the second mission, listen to the conversation in the rebel camp. You will be ordered to find Meller's office, but first, you must infiltrate the castle - the largest building on the map. Three main paths lead to the northern part of the map:
- The left path (#1 on the map) requires crossing a bridge over a river.
- The middle path (#2 on the map) involves using the main road with an enemy outpost.
- The right path (#3 on the map) involves crossing the river in the forest.

All three paths are described in more detail below.
The left path is one of the two that need to be considered in our guide (the right path will also work). It leads to a church that stands out against the background of the surrounding area. When you get there, you can climb the tower. Get rid of the two enemies on the top floor. Sabotage the generator to mask future shots, but only fire when a sound wave appears, indicating loud noises. You can use this to take out nearby enemies (including northwest of the farm).
The bridge over the river is guarded by several soldiers (including one on the observation tower) and a machine gunner. All can be eliminated from afar. For example, from the aforementioned western farm, where you can sabotage the operation of the truck and create a loud noise to mask the shots. Crossing the bridge will allow you to approach the paved road separating the southern part of the map from the castle grounds to the north.

We do not recommend using the middle path. It leads to a heavily guarded outpost that cannot be bypassed. Even if you manage to kill some enemies from a long distance, as a result of this, opponents from all over the castle, as well as the crews of vehicles traveling around the map, can be alerted.

In our opinion, it is best to take the right path, as it leads to the perfect passage to the castle, which will allow you to avoid most of the opponents. Following this path, you will approach the farm. You can shoot enemies from a safe distance, or kill them as you approach. At the farm, go to the main building and climb into the attic to find a generator. You can sabotage his work to create noise and mask future shots. As usual, fire only when the sound wave is visible.

Head north or northeast to the second farm. Here you need to act carefully, because inside the western building, on the first floor, a sniper is hiding. If you manage to get to the northern building, inside you will find an armory, in which, in addition to weapons, ammunition, and other supplies, there is also a workbench for upgrading weapons. There you will also find the key to the old tunnels. We talk more about tunnels below.

The path through the forest or through the farm will allow you to approach the paved road that separates the southern part of the map from the castle area in the north.
Regardless of which way you approach the castle, beware of vehicles patrolling the main roads. Various options are possible - a truck, a Kübelwagen, or a motorcycle with a trailer. You can destroy enemy vehicles with mines, but other vehicles can be alerted as a result of such an attack. It's better to hide first. For example, in the tall grass near the road, skip the technique by.

Infiltrating the castle
You can enter the castle from almost any direction. You can search different floors of the building. However, I recommend following the building through the old tunnels. The entrance to them is located southeast of the castle. And you can easily get there if you have previously taken the right route.

The entrance is closed, and there are two ways to get inside:
- Use explosives (which can be found on nearby farms).
- Find the tunnel key. To do this, you need to visit the eastern farm. The key lies on one of the tables in the main building of the farm (beware of the sniper in this area, who is hiding on the top floor of one of the buildings!).

After passing through the tunnels, you will reach the moat surrounding the chateau. This area is patrolled by single targets who can be easily surprised (and hide the bodies). Once you reach the moat, you will have two paths to choose from:
- Basement entrance. After dealing with the opponents, you can find a valuable workbench with an upgrade for sniper rifles. Among other things, you will be able to unlock the first silencer models. In the basement, you will also find several passages to the upper floors of the building.
- Lianas on the building. Several vines grow on the outer walls of the castle. Climbing them, you will find open shutters. Use them to get inside.

Climbing the south bridge leading to the castle is a bad idea as it is heavily guarded. You will have to get rid of a lot of enemies, including those standing at the windows and on the balconies of the castle, which will have excellent visibility (as a result, they can raise the alarm).

There is an alternative - to approach the castle from the east (first choosing the right path) or from the west (first choosing the left path). In these cases, enemies can spot you from a great distance. A sniper has settled in the northern building, who is looking through the territory of the main courtyard. Your best bet is to sneak inside, go up to the top floor, and get rid of the sniper in melee.
Find Meller's Office
Meller's office is located in the western part of the castle, on the middle floor of the building. You can get there using the main stairs. There are two of them - in the eastern and northern parts of the building. See below for details on how to get to the office. While moving along the main corridors of the estate, keep an eye on the radar and activate the focus to reduce the chance of collision with enemies.

Elite opponents may appear closer to Meller's office. They are equipped with better equipment, increased durability, and an increased health bar. It will be difficult to finish them off with silenced weapons, so it's best to use last hits by sneaking up on them from behind.

How to get into Meller's office and find all the secrets
Option 1: open the reinforced door
The most obvious option is to use the main entrance to the office, which will be locked. You cannot lockpick this door. But there are two ways to open it.

The first option is to get the door key that Friedrich Kummler has. You will find a man in the eastern ballroom of the castle. This is the only target to eliminate in the second mission. Try to get close to Kummler's corpse right after you drop the chandelier on it (or kill it in some other way). Otherwise, the corpse may disappear and you won't be able to pick up the key.

The second option is to destroy the door with explosives. The game will prompt you to visit the castle basement - the same room where you can find another workbench. Return to the door and set the charge. But do not forget that the explosion will make a lot of noise and can raise an alarm among nearby enemies.

Option 2: go from the attic

Using this method, you must climb to the top floor of the building in order to be above Meller's office. Here you will find a closed door that you can open with a lockpick or a bolt cutter. In the attic, look for a hole in the floor. Jump into it to get to Meller's office.

Option 3: climb through the window

Here you need to go to the window to the left of the entrance to the office, guarded by the only enemy. Climb through the window and follow the ledge to the left to reach the chute. Climb up and continue moving to the left. Ultimately, you must get to the place where you need to go down. Carl should automatically grab the bottom window sill. Now you can go up and get into Meller's office.

Where to find Meller's cache

Regardless of which option you take to get to Meller's office, you need to interact with some items. One of them will open a secret passage. The object is always random, so interact with the available ones, one by one, until the passage to the secret room opens. The secret office has collectibles and unique loot. The most important are the documents on Operation Kraken.

Return of stolen antiques
This is the only side quest in the second mission.
Antiques #1. figurine of a soldier

The first artifact is from a sniper hiding inside a building northeast of the main courtyard of the castle. To quietly get inside, move along the walls. Climb to the top floor, eliminate the sniper (for example, in close combat) and search his body to return the stolen item.
Antiques #2. Group Figurine

The second artifact is inside a chest in the southern part of the castle. You need to get to the top floor of the building and look into the room where the chest is. To open it, use a master key or a bolt cutter.
Antiques #3. Statuette of an old man

The last, third artifact is in the bedroom in the western part of the castle. Explore the middle floor of the building to get to the right room. Find the document lying in front of the bed. Interact with the painting hanging on the wall to move it and reveal the safe. You received the combination from the safe when studying the document. Now you can open it without using explosives. Inside you will find the last stolen item.
Friedrich Kummler
Friedrich Kummler is another target on the list (the only one in the second task). Eliminating Friedrich is an optional quest, but if you kill the enemy in the right way, you will receive the K98k secondary weapon. Friedrich participates in a ballroom evening in the eastern part of the castle.
Assassination of Friedrich Kummler

The easiest way to get to the ballroom is from the side of the moat - by climbing up the vines and using the shutters. On the other hand, this approach will make it difficult to eliminate the target, since it will be difficult to avoid detection because you have to shoot at the chandelier. Instead, you can go to the balcony above the ballroom. Get to the top floor of the castle. For example, you can climb the vines in the main courtyard. After reaching the upper balconies, head east to reach the stairs. Use it to go down to the lower floor.

Walk a little north. Eventually, you will find yourself above the ballroom. You can use binoculars to locate the target. Friedrich Kummler will chat with someone and go to the table. On the right side there is a chandelier mechanism hanging over the ballroom. When Kummler is standing next to the table, you can interact with the mechanism so that the chandelier falls on his head. The falling chandelier will kill Friedrich, but you can save just in case.

Evacuation
You will be able to evacuate from the map only after you get to the castle, find Meller's office, and open the secret room after collecting all the documents. Searching for antiques and killing Friedrich Kummler is optional, as these are optional tasks. And do not forget about the collectibles.

The evacuation zone is located at the back of the castle. The area adjoins gardens and open countryside. You can get there through the gardens or the main courtyard. On your way to the exit, pay attention to two areas. One enemy is hiding on the northern hill. It is best to kill him with a shot from afar. There is a sniper in the east building, and there is a good chance that you have already dealt with him earlier, doing a side task or just exploring the area around the castle.

New enemies and a truck may appear in the gardens. You can try to get rid of the enemies by stealth or try to bypass them from the west. If you plan to kill enemies, we recommend finding a good vantage point in the castle and shooting them from a safe distance. The exit from the map is on the outskirts of the estate. Walk towards it to complete the second mission.
Comments
Post a Comment