We tell you how to complete all the story and side tasks, eliminate targets, successfully evacuate, find all the keys and open all the doors
Before setting out on your mission, take a look at the map below. It presents all the main points of view:
- Yellow labels are the main tasks.
- Red marks are targets for leaves.
- Green marks are collectible items

The most interesting and important places on the map
Observation deck - No.1 on the map

You will reach this place at the very beginning of the mission (if you appeared at the default starting point). This is a great place for long-range shooting and taking out Nazis from a safe distance (including enemy snipers). You don't have to worry that someone will hear the shots.
Checkpoint - No.6 on the map

The checkpoint is located on the main road leading to the central building of the monastery. This is the most direct path to the target marker. Alternatively, you can find a passage at the back of the church, located northeast of the checkpoint.
Church - No. 8 on the map

The smaller church is located in the eastern part of the city, and on the way there you have to watch out for enemy snipers. At the top of the church, the tower is Officer Brühl, who has a letter containing information about the meeting place. In addition, behind the church, you can find an alternative passage to the main monastery.
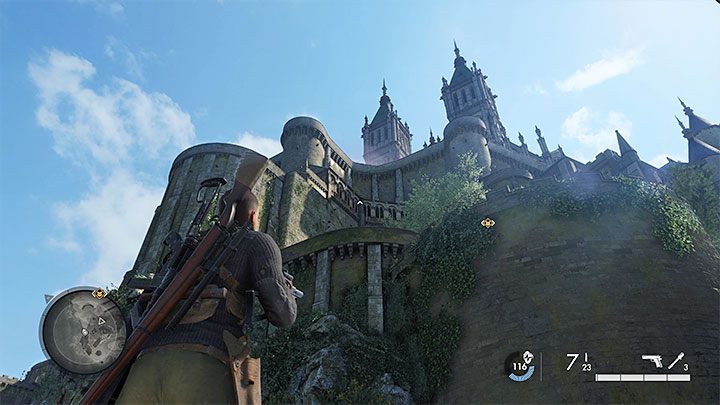
Monastery - No. 9 on the map

This is the main building on the map, which is one of the mandatory objectives of the mission. You can enter the huge building from several directions but expect some serious resistance here. In the end, Carl must get to the tower in order to eavesdrop on the conversation and get the necessary information.
Spy Academy - #12 on the map

The building of the Spy Academy is located north of the main monastery. The study of this place will unlock the only side goal - the destruction of the instructor. By default, you don't know anything about this task. There will be many soldiers on the territory of the academy, but you do not have to kill everyone.
Evacuation point - No. 13 on the map

The evacuation point is located in the northern part of the map. This is a very difficult area because there are many snipers. The best tactic is to choose viewable positions and take out enemies from afar. The main thing is not to rush!
general information
The monastery of Beaumont-Saint-Denis on the island from the third mission is the most important place. Apart from the multi-storey main monastery, you will also be able to explore the surrounding roads and buildings. In general, this multi-level map resembles a maze. There are many more or less obvious passages that you can find. I advise you to thoroughly study the map in order to find as many optimal routes as possible.
The mission will start at the south end of the map, and your first task is to cross the beach on your way to the monastery. At the initial stage, you will be able to eliminate enemies from a safe distance. The situation will change dramatically after reaching residential areas, where you will have to face opponents at short and medium distances.
The task is complicated by the presence of enemy snipers. The buildings are densely packed, so it will be difficult to identify them. The snipers themselves have good visibility. First of all, you need to carefully examine the area through binoculars and react to the rays of light reflected from the sights of a sniper rifle.
The first time you complete the mission, you will have a single starting location. However, you can unlock two more and get a total of 3 possible starting points. The West (Smuggler's Wharf) seems to be the most preferable, as you will find yourself close to the road leading to the hill where the main monastery is located.
There are several main and side tasks:
- Find a meeting point. First, you need to get to the main part of the island, and then find out about the scheduled meeting at the monastery. There you can study the documents or eavesdrop on the conversation.
- Eavesdrop on the conversation and get information about the Kraken. Carl must reach one of the upper levels of the monastery in order to eavesdrop on the conversation of enemy officers and obtain the files of Operation Kraken.
- Side quest. In the third task, you can complete only one side quest, in which you need to get rid of the officer responsible for training new spies.
- Fabian Richter is the only target to eliminate. By default, he attends the meeting associated with the main task. Below we will tell you how to catch Richter by surprise.
- Evacuation. Getting to the boat in the northern part of the map is the last and not the easiest step. We will suggest the most optimal escape route and give advice on how to avoid snipers.
Finally, you can find 19 secrets and collectibles, including three workbenches, notes, and mementos. Their location is marked on the map above.
How to get to the island and determine the meeting point
How to get to the main part of the island
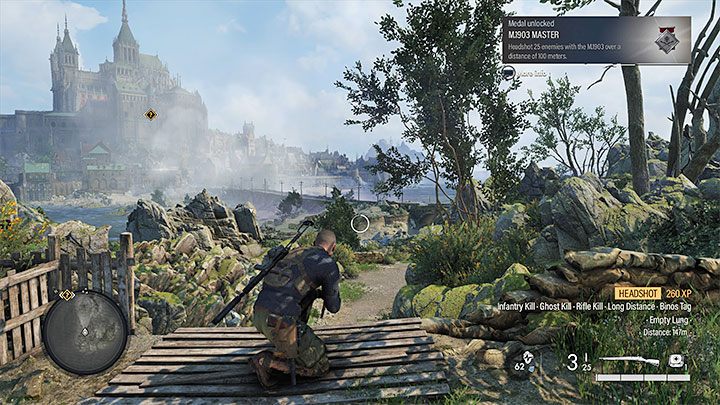
You will find yourself at the southern end of the map. Before completing the first main task, you need to get to the northern island (the one with the monastery). Shortly after the start of the mission, you will reach an observation deck. Use it to get rid of nearby enemies. From here you can shoot from a safe distance and no one can hear you. For added safety, you can shoot at those moments when planes are flying over you, emitting a sound wave (it will be displayed on the screen as a noise zone).

Try to eliminate as many enemies as you can on the beach (including those on motorbikes) and in the buildings below. It is even more important to kill the snipers on the roofs of the distant buildings. Two of them are right in front of the starting location, one or two are on the left and one more is on the right. Carefully scan the area through your binoculars so that you don't miss anyone (otherwise they will create a problem later).
When you clear the territory, go to the island. If you feel confident, you can go through open country, but it is much safer to hide behind bridge piers and other large obstacles.

When you get to the lower part of the city, I do not recommend going to the right, because there is a minefield (you can see warning signs), and it is very easy to die there. Instead, start your journey towards the upper buildings around the monastery in the center or through the area on the left.
Find out the meeting point
In theory, you don't need to look for clues about the meeting place to progress on a mission. If you're having trouble finding clues, you can head straight to the meeting point described in the next section. You will not break or spoil anything, just lose a good part of the content of the task. The active task will change as you get closer to your destination.

The game will not show you the exact target marker. You have to find out the details of the planned meeting of officers by doing a little investigation. There are 3 main ways to find a meeting point.
The first involves looking at the parking lot along the winding road in the western part of the map. This place could be seen when checking the area from the observation deck at the beginning of the mission. There are several cars there.
When traveling to parked cars, try to avoid or silently eliminate enemies so that an unnecessary alarm in the area does not go off. If you manage to get into the indicated place, you can eavesdrop on the conversations of the soldiers and find out the planned meeting place.

The second option is to find Richter's documents. Areas with clues on the map will be marked with an "eyes" icon. The first such area is the lower city, which you will reach after the beach. A document can be found in the area, from which you will learn that the next clue is located in one of the enemy outposts.
You must reach the checkpoint in the middle of the map where the road forks. One of the paths leads to the largest monastery. You can get there in many ways - along the main roads or using vines to climb fences and buildings.

After the checkpoint, you need to find documents. Explore the building next to the checkpoint and find another document. This will be enough to find out the meeting place.

The third option is to find Brühl, one of the officers invited to the meeting. To do this, you need to get to the church in the eastern part of the map (it is smaller than the main monastery). You can get there from the south, but you need to be careful because there are snipers in the eastern part of the city. Find the stairs leading to the church tower. There will be a sniper and Brühl upstairs. Get rid of both by any means. After that, examine Brühl's corpse to find a letter with information about the meeting place.
Note: Killing Brühl will in no way jeopardize the main objective of the mission. The meeting may still take place. Bruhl just won't come to her.

Eavesdrop on the conversation and gather information about the Kraken
How to get to the monastery
Above, we told how to find out where the meeting of officers will take place. You learn that the officers are planning to meet at the main monastery, on one of its upper floors. This is the tallest building on the map and you shouldn't have any trouble finding it. Unfortunately, it is impossible to climb from the side of the rocks. You must choose a different, more difficult route.
A more obvious option is to follow the main road leading up the mountain to the monastery building. You can start your journey from the checkpoint. You can take the side path, but be careful as there are a lot of opponents on the hill. In addition, on the road, you can collide with a vehicle.
A less obvious option is to look for a path that starts behind the smaller church on the east side of the map. The one where you could find Brühl. Get inside the church and go through its main hall to take a shortcut. Head north of the church and you will find the indicated path. This path allows you to bypass many of the enemies patrolling the main road up the hill.

Eavesdrop on the conversation
There are several entrances to the main monastery, all of which are heavily guarded. We recommend taking the path from the east. There is an armory in the area. The key to it is carried by an officer found in one of the buildings north of the armory itself. You can also blow up the armory door, but the enemies will surely hear you. Once you're inside the armory, look for supplies and find a path that leads to the main monastery. Follow it to avoid the guards standing at each entrance and located on the lowest floor of the monastery.

Whichever method you choose, be sure to be discreet. However, even if you warn the opponents, the game will not end there, since you can still get the documents. However, this will prevent you from completing a side quest related to Fabian Richter.
Now you need to climb the stairs to get to the upper floors. Use your radar and destroy all the enemies, don't forget to hide the bodies. Use finishing moves or a reliable weapon with a silencer. When you reach your destination, you will realize that the meeting room for officers is closed. The key is with the officer found on the same floor. If an alarm has been raised, you will be attacked upon entering the meeting room. If you managed to stealthily get to this point, you can eavesdrop on the conversation of the officers. After the encounter is over, you will also have the option to kill Fabian Richter (elimination target). We talk about this below.

No matter how the situation develops, your ultimate goal is to gather intel on Operation Kraken. You can find information on the table in the meeting room. Either clear the area of enemies or wait for the officers to leave the room after the meeting is over.

side quest
In search of a spy academy

Initially, this quest is not in the journal. In order for it to appear in the magazine, you must get to the Spy Academy or eavesdrop on the conversation of two officers, which will take place during the main mission. The building in question is located in the northern part of the island, not far from the monastery. The spy academy is guarded by numerous enemies, but you don't have to destroy them all.

Stop learning
The instructor keeps to the lower floors of the building (the search area is marked in blue), and the easiest way to get to them is to sneak through the northern gardens. You can kill all the officers you meet and approach the corpse or use your binoculars to confirm the target. Killing the instructor will complete this short side mission.

Fabian Richter
During the mission, the target changes its location several times, but the best place to eliminate Richter is the monastery tower. The monastery is the place where the meeting of the officers takes place (one of the main objectives of this mission). So you can complete both tasks in one go. Eliminating Richter is optional, but successfully completing the quest (silent kill) will reward you with a P08 secondary weapon.

The assassination of Fabian Richter
As for killing the target, the most important part of the task is to avoid detection by enemies on the way to Richter. The reason is that you need to kill Richter silently. The target must not be warned and you may not use firearms.

To successfully complete the task, you need to get the key to the tower and quietly enter the room with the officers. Once you have found a good hiding place, wait until the end of the meeting. The officers will start leaving the room one by one, with Richter being the last one. Throw a bottle to distract Richter (preferably next to a stained glass window). He decides to check the place and separates himself from the others. The last step is to wait for Richter (he should already be alone) to head towards the exit again. Approach him from behind and kill silently.

Evacuation
Evacuation from the place of the third task is possible only after completing all the main tasks. These tasks have been detailed above. You must find out and get to the meeting point, as well as eavesdrop on the officers and get information. You can also optionally complete side missions such as killing Fabian Richter and an instructor from the spy academy. You can linger and collect collectibles.

Island escape
If you want to leave the map only after completing side actions, it is best to use the path next to the monastery courtyard (northeast of the map). If you want to evacuate immediately after collecting information about the operation "Kraken", it is best to use the stairs from the screenshot. It will allow you to climb a large tower. Eventually, you will reach two places where you can rappel down to quickly reach the walls surrounding the courtyard.

Here you can optionally go through the office of spies, which is adjacent to the aforementioned walls. In one of the rooms, there is a key to the basement, which will allow you to find an alternative path leading to the stairs going down. Along the way, you will encounter a sniper and you can eliminate him quietly. Regardless of the path you choose, keep in mind that there will be even more snipers in the northern part of the map. They are located on small islands with observation towers.

Don't rush to the extraction point. Move along one of the upper paths to find and eliminate the snipers with shots from a safe distance. If your weapon does not have a silencer, first deal with the nearest soldiers in the area so that they do not raise the alarm because of the noise (it is also possible to shoot at the moment when a plane is flying over you, making a loud noise). In the end, you need to go to the northernmost island - go down to the beach and walk through the shallow water. Your destination is a small marina with a boat. Interaction with her will allow you to leave the island and complete the task.
Comments
Post a Comment