Once you get to the right place, talk to the NPC located here. The man will talk about the monster eggs that Warren hid in different mines. Also, the character will give the key to the mine in the northern part of the island.
A new marker will appear on the map. Get back on your train. Use the green lever to ride forward and get to the mine. Use the red lever when you need to stop the train next to the mine. Interact with the mine gate to open it and enter inside. Follow these steps to get the second egg:
- Enter inside the mine and follow the tunnel.
- There will be a bridge on the left side. Cross it and go left until you hear a cultist whistle.
- Listen carefully to understand which side the enemy is on. If the whistle is heard from the right side, then go to the left, and vice versa.
- If you're near an enemy, follow slowly and you'll soon reach a lever that raises a gate leading to a room with a blue egg.
- When the enemy goes the other way, interact with the lever to open the door.
- All opponents will be warned that you took the blue egg. Don't go back the same way, but instead move on until you find another lever.
- Use it to lower the nearby bridge.
- Get out of the egg shaft, return to the train and go in search of the last egg.
Mine or ... tomb?
"Mine or tomb?" - one of the main missions related to the search for eggs. To receive the task, go to the northwestern part of the island, and to the blue marker on the map. There are two such markers on this side. You are interested in the one in the west. If necessary, toggle the arrow to change the direction of the rails.

Once you're there, talk to the NPC to learn more about the eggs. You will also learn about the sanctuary, where you need to take all the eggs in order to destroy them and call on Charles. You will receive the key to the mine in the west of the island, east of the quest giver's current position.
Find these places on the map and get back on the train. Use the green lever to get to the mine. Use the red lever to stop the train next to the mine and go inside. Be careful as the tomb is guarded by Warren's armed men. Make your way to the mine gate unnoticed. Interact with them to unlock getting inside. Follow these steps to get the last egg:
- Enter the mine/tomb and go down the stairs.
- You will hear a whistle, so use the wooden barricade to stay in cover and keep an eye on the enemies.
- When the enemy goes the other way, go to the next barricade.
- Go through the next door and use the cover again to go through the broken wall in the far right corner
- Go into the tunnel and take the elevator down by pulling the lever.
- Go deep into the mine. Wait for the enemy to go the other way. You can also go into the tunnel on the right to skip the mob.
- Once he leaves, go forward until you find a red egg.
- Take the egg, go forward, and turn left.
- You will reach another elevator. Use the lever to climb up.
- There will be new mobs on the surface, so ignore them and run toward the train. If necessary, kill opponents using the minigun mounted in the back. If you have collected all three eggs, proceed to the task below (or read the description of the previous missions above).
demolition project
Collect eggs or not, this task will be available immediately after the prologue. And even if you have collected all the eggs, you should not go to the secret temple: you need to prepare something else.
The Demolition Project is one of the four main quests available after the prologue. After completing all these quests, you will be able to kill Charles in the final fight. The mission is given by a guy named Paul, who lives in the northern part of the island. Players must travel north and interact with the NPC to activate the quest. There are two blue markers in this direction, and in the specific case, you need to interact with the one further north.
Once you get to the marker, talk to an NPC named Paul. He will give more details about the monster eggs that Warren hid in the mines. Eugene's son will ask you to plant explosives on a wooden bridge. The bridge is located near Paul's house, so go to it and interact with the supports to set the charges.
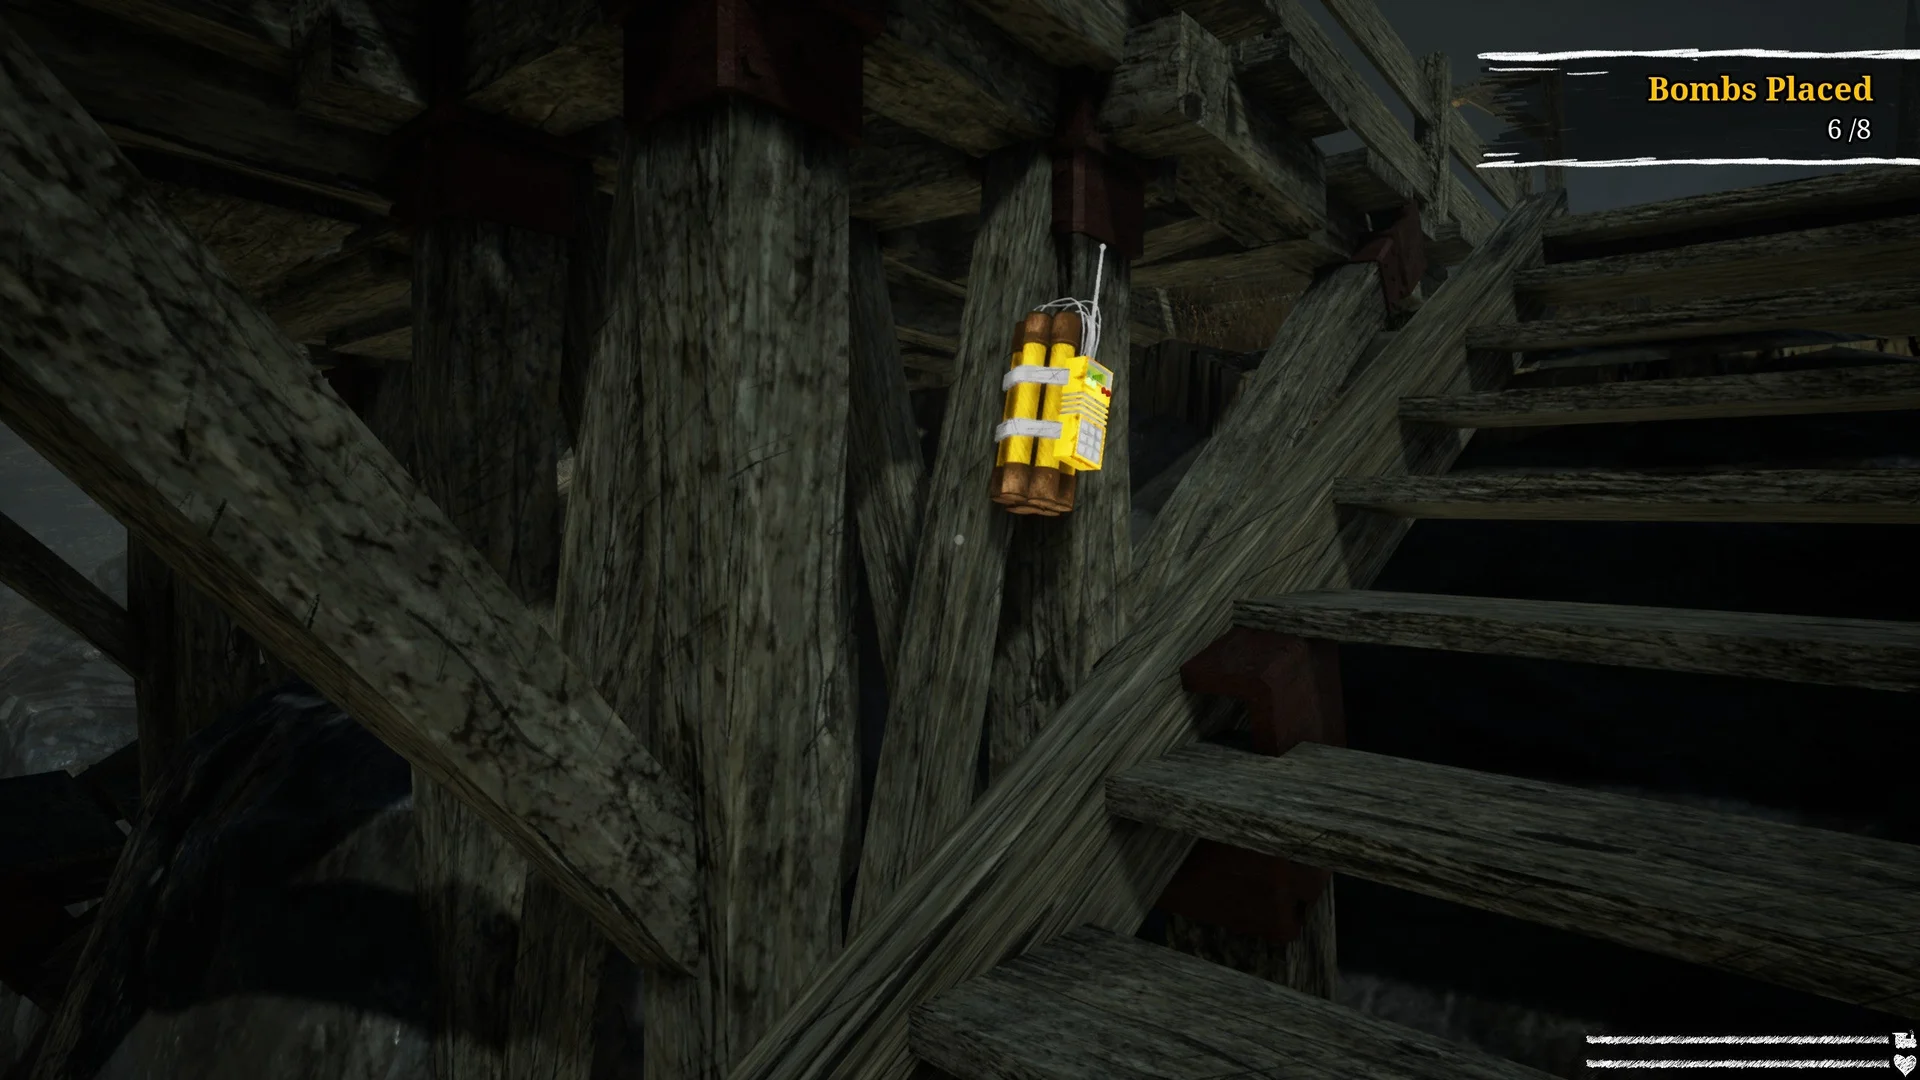
There are 8 pillars on the bridge and you need to place a charge on each of them. Four supports are located on one side and four on the other. Use the steps to the right and left of the passage to the bridge to go down a little lower and plant charges on each support. Once the charges are set, return to Paul and he will give you the key to the secret temple.
After obtaining the key to the temple, the last mission will be unlocked (assuming you have found all three eggs), in which you can destroy Charles once and for all.
To complete
To make Charles mortal, you must find all three eggs guarded by Warren's cultists. The eggs are hidden in various mines scattered throughout the island. Gamers need to talk to different NPCs, who will provide a key to each mine, and then go there and pick up the eggs.
After obtaining all the eggs and planting explosives on the wooden bridge in the "Demolition Project" task, the final mission "Finish" will become available (this is the translation). You need to go to the sanctuary, which is located in the center of the island.

Go there by train, and when you get close, stop the train and go to the temple. Be careful because it is guarded by Warren cultists. Climb the main stairs to reach the locked door. Interact with her to use the temple key and open the door. Go inside and interact with the altar to trigger a cutscene in which the player will plant all the eggs and draw out Charles. As a result, the monster will turn into Hellish Charles. The battle will be more difficult, but now you can destroy the enemy.
Your character will automatically return to the train and you will be able to attack the monster. Use the normal weapon in the back of your locomotive to shoot Charles. Of all the weapons, the regular minigun seemed to me the most optimal. Use short bursts to not only deal damage to Charles but also slow down his pace, forcing him to keep his distance. Don't forget to keep an eye on the train's health bar in the bottom right corner of the screen. In which case, you can move away from the weapon and interact with the drawing on the table to repair the train for the trash.
Keep shooting Hellish Charles and use the junk to repair your train. After depleting every quarter of his maximum HP, Charles becomes more aggressive. After the first time, he will be able to teleport. Aim at Charles's head, and when his health pool is depleted, the final cut scene will start. Watch the credits.
Weapon Quests
Even though the main goal of Choo Choo Charles is to hunt down and destroy Charles, you will probably want to take a break and explore all the remaining content. Moreover, some tasks allow you to unlock completely new types of weapons for your train.
In the world of Choo Choo Charles, you can find three additional types of weapons, between which you can switch at any time while on the train. To get a new weapon, you will have to complete several separate tasks. Below we explain how to get and complete these quests.
When studying the map, pay attention to the color of the markers. All red NPC markers on the map indicate that the mission offered by the characters will unlock new weapons.
Dichlorvos: how to get a flamethrower
The marker for this mission is located in the southeastern part of the island. Once you're there, enter the fortified fort and talk to the man standing in front of the burning building. He will tell you that he accidentally set his barn on fire while experimenting with a flamethrower. The man will ask you to put out the fire, and as a reward, he offers the same flamethrower.
After completing the dialogue, go up the stairs on the left side of the house. At the top is a large cistern and a red valve with a pipe. Turn the valve to supply water and put out the fire.
After the fire goes out, be sure to look inside the building and pick up the can of orange paint standing on the table. When it's done, talk to the quest giver to get a flamethrower. The weapon will automatically appear on the wall inside your train, above the drafting table.
Infiltrate the Gang Camp: How to Get the Gatling Gun
This mission can be obtained from a marker in the northwestern part of the island. When you arrive at the place, look for a woman on the porch of the house with barbed wire. Talk to her. She will tell you that her late husband Bob was collecting some kind of weapon that could defeat Charles. She will offer this weapon, but you need to be brave and find the stolen guns in the nearest cultist camp.
The bandit camp is the next destination. When you're ready, open the map to see the new location. The camp is located southeast of the quest giver's house. You can reach it by following the rails south of the current building. This mission is a bit different from other missions as you will have to figure out exactly how you will infiltrate the enemy camp. There will be many enemies here, so it's not entirely correct to act covertly. Walk south of the marker, leaving the train a short distance from your destination. After leaving the train, look for an arrow to switch tracks southwest of the camp.
Avoiding detection, turn the lever and then return to the train. As soon as you are on board, arm yourself with a machine gun and follow at full speed to the enemy camp. Enemies will soon find you and start chasing you. As soon as you attract their attention, stop the train, quickly stand behind the machine gun, and destroy the cultists. Kill as many as you can, then move away from the weapon, return to the control panel and reverse back into the camp. Complete the remaining objectives.
Keep going until you clear the camp. Once everyone is dead, jump off the train and find the ladder leading to the upper bridge, above the rails. On it you can go to the top of the cliff. Enter the hut and find the key lying on the table. After receiving the item, go back down and find the workshop located on the opposite side of the camp.
Using the key, you will be able to open the workshop door and find Gatling gun barrels on the table. Grab the items to complete the quest and add new weapons to your arsenal.
Bunker Heist: How to Get the Rocket Launcher
The mission to find the rocket launcher can be taken from the marker in the northeastern part of the island. As soon as you arrive at the place, enter the nearest building and talk to the seller. He will say that he created a rocket launcher that will allow him to kill Charles, but he needs ammunition to complete it. To get the ammunition, you will have to get into the bunker, located in the depths of the location.
After listening to the quest giver, open the map to find a bunker marked with a marker, west of the current location. Get on the train and head to the marker on the map. When you get close to the right place, you will see a bunker and a large area with heaps of sand.
Go to the center of the sand pit and take out the dynamite from the box. Head to the bunker door north of the dynamite crate location and interact with it. So you install dynamite on the door. Immediately move away from the bunker and wait for the explosion.
Once the door explodes, go inside. You will find yourself in a long shaft with a trolley full of explosives. The door will be locked ahead. Interact with the cart to push it down and blow up the door. Head through the open doorway to find a flare gun ammo box in the center of the room. Pick up the rockets and then return to the train. Drive to the shop owner and give him the missiles to complete the mission. Now your train has a rocket launcher!
side quests
Choo Choo Charles gives you a simple task: find and destroy Charles, a giant train with spider legs. The task is not easy, so you need to upgrade your train as much as possible.
To do this, you need a temple. Lots of rubbish. There are several ways to find junk, but the easiest way is to complete side tasks. All side quests given by NPCs marked with yellow markers will reward you with junk. What do you get the trash as a reward, and in the course of missions, searching different locations.
Side quests, as well as main quests or weapon missions, can be completed in any order!
Pick up junk from Candice's house
This mission can be obtained from a marker in the southeastern part of the island. When you arrive at the place, talk to the woman holding the rifle in her hands. Her name is Candace. She will give you a key and ask you to look into the building behind her to pick up some junk. Head towards the building and go up to the second floor using the back stairs. Go through the only door on the second floor.
Inside the house, you need to find 9 pieces of trash. Collect everything and the mission will be completed. Before you leave, go to the table and read the note to get an additional piece of knowledge. It seems that Eugene was a very valuable member of the community, and the island hoped that he would overcome Charles ...
master keys
This side quest can be started by heading to the shop in the southeastern part of the map. Once you're there, talk to the vendor and he'll tell you that there's a locked chest outside of his hut that you can open with lockpicks. Once the man is done talking, exit the store and head west to the marker that appears on the map. Here you will find a chest next to a rusty, broken train.
Interact with him to trigger the hack mini-game. To succeed, one must wait until the small white dot moving along the large white ring aligns with one of the hollow circles. Once this happens, click LMB. The mini-game will get more and more difficult. As soon as you do this with one, two, and three notches in succession, the chest will be opened.
Take everything inside and take it to the vendor to complete the quest. As a reward, you will receive the trash.
swamp swim
This side quest can be found by a marker in the southeast corner of the map. As soon as you arrive at your destination, talk to the witch in the hat standing by the fire to start a new mission. She will ask you to bring the carcass, which is needed for her witch's drink. The only problem is that the carcass is on an island in the middle of the swamp, and the mysterious monster Bari swims in the swamp itself.
The old woman will tell you that you can recognize the monster by the splashes that form on the water. If he gets too close, he will attack you. But if you are motionless, then the monster will not even notice you and will swim away further. When you're ready, head to the dock north of the cauldron above the fire. Before jumping into the water, find the island itself. It is located directly opposite the pier. When you're ready, jump into the water.
Once you do that, stop and look for the monster. Watch for ripples over the water. If he is near you, wait a bit. When the monster moves away, swim towards the island. In this case, the enemy will immediately begin to move toward you. Stop when he approaches, wait and repeat the steps. After you get to the shore, find the fish carcass in the center of the island. Once you get the e, go back to the witch using the same tactic as the monster is still in the water. Give the fish to the old woman to complete the quest and get some junk.
Gather supplies in Tony's barn
This side quest is located at the marker in the southeastern part of the island. When you get there, talk to the man standing in front of the house. He will talk to you about Charles, noting that your presence is critical to destroying the mutated train and he appreciates your courage. Then he will hand over the keys to the barn on the hill, offering to take all the junk stored inside.
Climb the hill, open the barn (a mark will automatically appear on the map), and pick up the trash. You will find 9 pieces of junk and a note about Eugene, Warren, and Charles. Once the barn is cleared, the quest will end.
In Search of Saint Marinaal
This side quest can be found at the marker in the southeastern part of the island. When you get to this place, talk to the woman standing on the porch of your house. She confesses her love for pickles and asks for the return of the last jar hidden in a locked chest inside the cave. Once the conversation is over, open the map and follow to the marked place. The cave is located southwest of the Cucumber Lady's house. Please note that the chest needs a master key, which you will receive in one of the side quests described above (second in a row).
When you're ready, exit the house and go to the marker. Eventually, you'll find a cave next to a small camp filled with junk (and a can of purple paint that's under a small shed). There is a locked chest in the camp. Pick the lock to get a jar of pickles. Take them to the Cucumber Lady to complete the mission.
Adventures in the canyon
This side quest can be obtained from the marker in the center of the island. As soon as you get to the right place, you will get to the station. Climb to the second floor of the train station to meet a mysterious man who will ask you to pick up a blue box from a nearby cult camp.
The camp itself is located southwest of the station. After the mission starts, the camp will be marked with a marker on the map. When you're ready, move there. The best way to access the camp is through the canyon northeast of the train station, so approach it at an angle.
When you get there, you will see a single cultist. Wait until he turns away from you, and then approach the yellow cart to his left. Inside it, look for a blue box located on a crate.
Leave the camp and return to the quest giver. Give him the item to complete the quest.
The light in the darkness
This side quest can be found by a marker in the northeast corner of the island. When you arrive at the place, enter the hut under the lighthouse and talk to the injured woman. She will tell you that Charles seriously injured her leg. The woman will ask you to replace the fuses in the shield near the house so that the beacon works again. When you finish the conversation, a marker will appear on the map, pointing to the shed with fuses. Move down the hill northeast of the lighthouse. Open the map to see the desired location. You can put an additional marker.
Go to the shed and take the fuses lying inside - yellow boxes with red switches. Take the fuses back to the lighthouse and find the electrical panel outside, on the wall of the building.
Insert all the fuses and then activate them in the following order: far right, second from left to right, second from right to left, and far left. As soon as you do this, the beacon will start again. Go inside and talk to the woman to complete the quest.
Return diary
This side quest is taken from the NPC in the eastern part of the island. When you arrive at the place, talk to the man on the pier holding the suitcase. He will say that he decided to leave the island forever, but first, he needs to return the diary. As you understand, it is up to us to look for him.
The diary is located northwest of the quest giver and will be marked with an additional marker. Before heading out, search the nearest hut and collect the gray paint located under the awning opposite the hut. When you're ready, approach the train and ride to the marker.
When you get there, get off the train and go to the hut. Once inside, grab the nearby junk and then head into the bedroom at the back of the hut. There you will find a magazine lying on the table. Return to the man at the dock and give him the journal to complete the quest.
Sheets from a field of stones
This mission can be found in the center of the island. When you arrive at the place, talk to the woman sitting on the porch. She will say that every night she finds mysterious pages that someone glues on trees in the nearest forest ... This mission is, in fact, a declaration of love to the game Slender, which went viral back in 2012. Like the original game, the idea is simple. You need to find 8 pages attached to signs and trees. Once you do this, the task will be completed.
However, finding these pages is not so easy. You will be haunted by a ghost that will act faster and more aggressively as you collect new pages. Fortunately, he is still not as dangerous as Slender from the 2012 game. Although the ghost will become incredibly fast by the end of the quest, it cannot kill or harm you. Instead, it simply teleports you out of the forest without even taking the page.
The trick is to constantly run and change direction. The ghost does not teleport like Slenderman does, but instead follows you and can get stuck in obstacles.
If you find it difficult to find any of the pages, use our map. Once you've collected everything, return to Sarah to complete the quest and get the junk.
cloud climber
This side quest is located at the marker in the center of the island. When you get to the marker on the map, talk to the man standing on the bridge in front of the large mining facility. This charming guy's name is Ronnie, and he wants us to climb the towers, pick up the documents and bring them to the quest giver. And in return, we, "completely unexpectedly," get trash.
Once you've finished talking to Ronnie, go inside the left tower. Climb up the stairs and approach the doorway. There will be a big failure ahead. Run up and jump to the other side. Open the door on the right and go down the stairs to find a can of green paint. When you take the item, go back upstairs and go through the open doorway on the right.
You will be on a balcony. At the end of this balcony, there are some small boxes. Climb up the crates to the third floor. Once you've done that, use the stairs on the left to get to the fourth floor. Walk along the small path and look to the other side. You will see a large gap similar to the one you crossed earlier. Run up and jump back to the other side.
When you land, do not enter the nearest doorway. Instead, follow to the left of it. You will see a gap through which you will have to jump over. Like last time, run up and jump over the abyss. Climb up the stairs to the right. Keep going all the way to the top to find a room with a yellow filing cabinet. Open it and take the document. Once you've done that, return to Ronnie to complete the quest.


Comments
Post a Comment